![]() Phone: 605-554-1911 | Email : sales@primalrights.com
Phone: 605-554-1911 | Email : sales@primalrights.com
![]()
Load Development
May 8, 2016
Written By - Greg Dykstra
© Copyright 2009 - Present - Primal Rights Inc
ALL RIGHTS RESERVED
No part of this website or any of its content may be reproduced, distributed, or transmitted in any form or by any means without the express prior written permission of Primal Rights, Inc
Precision rifles are only one part of a much larger system.
You can have the most precise and accurate rifle in the world, and it will be for not without everything else being on point. The shooter must do their job by accounting for environmental conditions, breaking the shot correctly, and driving the rifle properly. The optic must allow trustworthy zero and repeatably accept firing solutions. Range finders, Kestrel's, and ballistic computers must be able to provide accurate data. The ammunition you are firing must be consistent and uniform. That last one is harder to come by than you might think. Depending on your rifle and the cartridge it is chambered for, you may not even be able to buy ammo that performs respectably. In order to achieve maximum precision and accuracy from your rifle, you must load your own ammo and you must know how to tune those loads to your specific rifle barrel. Each individual rifle barrel has its own specific behavior. Some clean up quickly while others take a lot of work. Some are fast while others are slow. Some are very finicky regarding bullet selection while others will shoot nearly anything well. It is this unpredictable behavior that dictates that we must tune our ammo to the specific barrel we are working with if we want to experience the most the rifle has to offer.
What exactly are we "tuning?"
In order to understand what the goal is when tuning a load for a rifle, we must first understand what we are trying to accomplish during load development. Pressure waves, vibration, and forced vibration are all very specific physics principles which dictate behaviors of objects or particles in the physical world. How this pertains to rifles is the simple fact that when we press the trigger, the firing pin is released, which is the first of several impacts that takes place in the rifle system. The firing pin hitting the primer and/or the firing pin stop (if dry firing), is an impact, which causes a vibration to transmit through the rifle components. You can feel this when dry firing. That click you hear, is vibration. When the primer explodes, it too creates vibration. The powder igniting and expanding, the bullet hitting the lands, and the subsequent recoil initiated all induces vibration. This is referred to as harmonic vibration, mainly because it travels in waves, which have a frequency. In addition to this vibration, there is a pressure wave that rides down the barrel just behind the bullet. That pressure wave stretches the barrel steel perpendicular to the bore and rides the length of the bore. I'm not going to spend a tremendous amount of time on these particular behaviors as they go far beyond the scope of this article, but suffice it to say that any one of these factors and all of them combined result in the muzzle of the barrel moving a great deal as your bullet heads down the bore. The position of your muzzle at the time the bullet exits the bore is the key factor at play here. The bore not only moves up and down, but left and right as well. It will oscillate as well as twist along it's length. What we're trying to do, is release the bullet at the most "stable" time, when the muzzle is behaving most predictably. We aren't tuning the ammo, so much as we are timing the bullets release. This isn't theory folks. This is settled science. So much so that there are some very accurate prediction models in place. QuickLoad for instance, is a piece of software that can calculate "barrel time." Essentially it will help you predict what components and recipes will perform favorably.
The most stable muzzle condition for the bullets release, will provide the most consistent and forgiving point of impact in relation to our chosen point of aim across the widest array of environmental and component conditions. As the atmospheric temperature changes, so does the behavior of the steel and various materials of your rifle. Not only that, but your powder itself can change burn rate which will change the pressure curve, and that also is based on temperature to some degree. Some powders are more sensitive to temperature swings than others. If we can discover the most stable muzzle position, then we can try to give ourselves a window of operation which can be the most forgiving of the changing variables at play. These stable conditions are called accuracy "nodes." These nodes are what we are after. The entire premise of this article is to help you learn how to discover the accuracy nodes on your own rifles.
Bullet Comparator Kit < You need this!
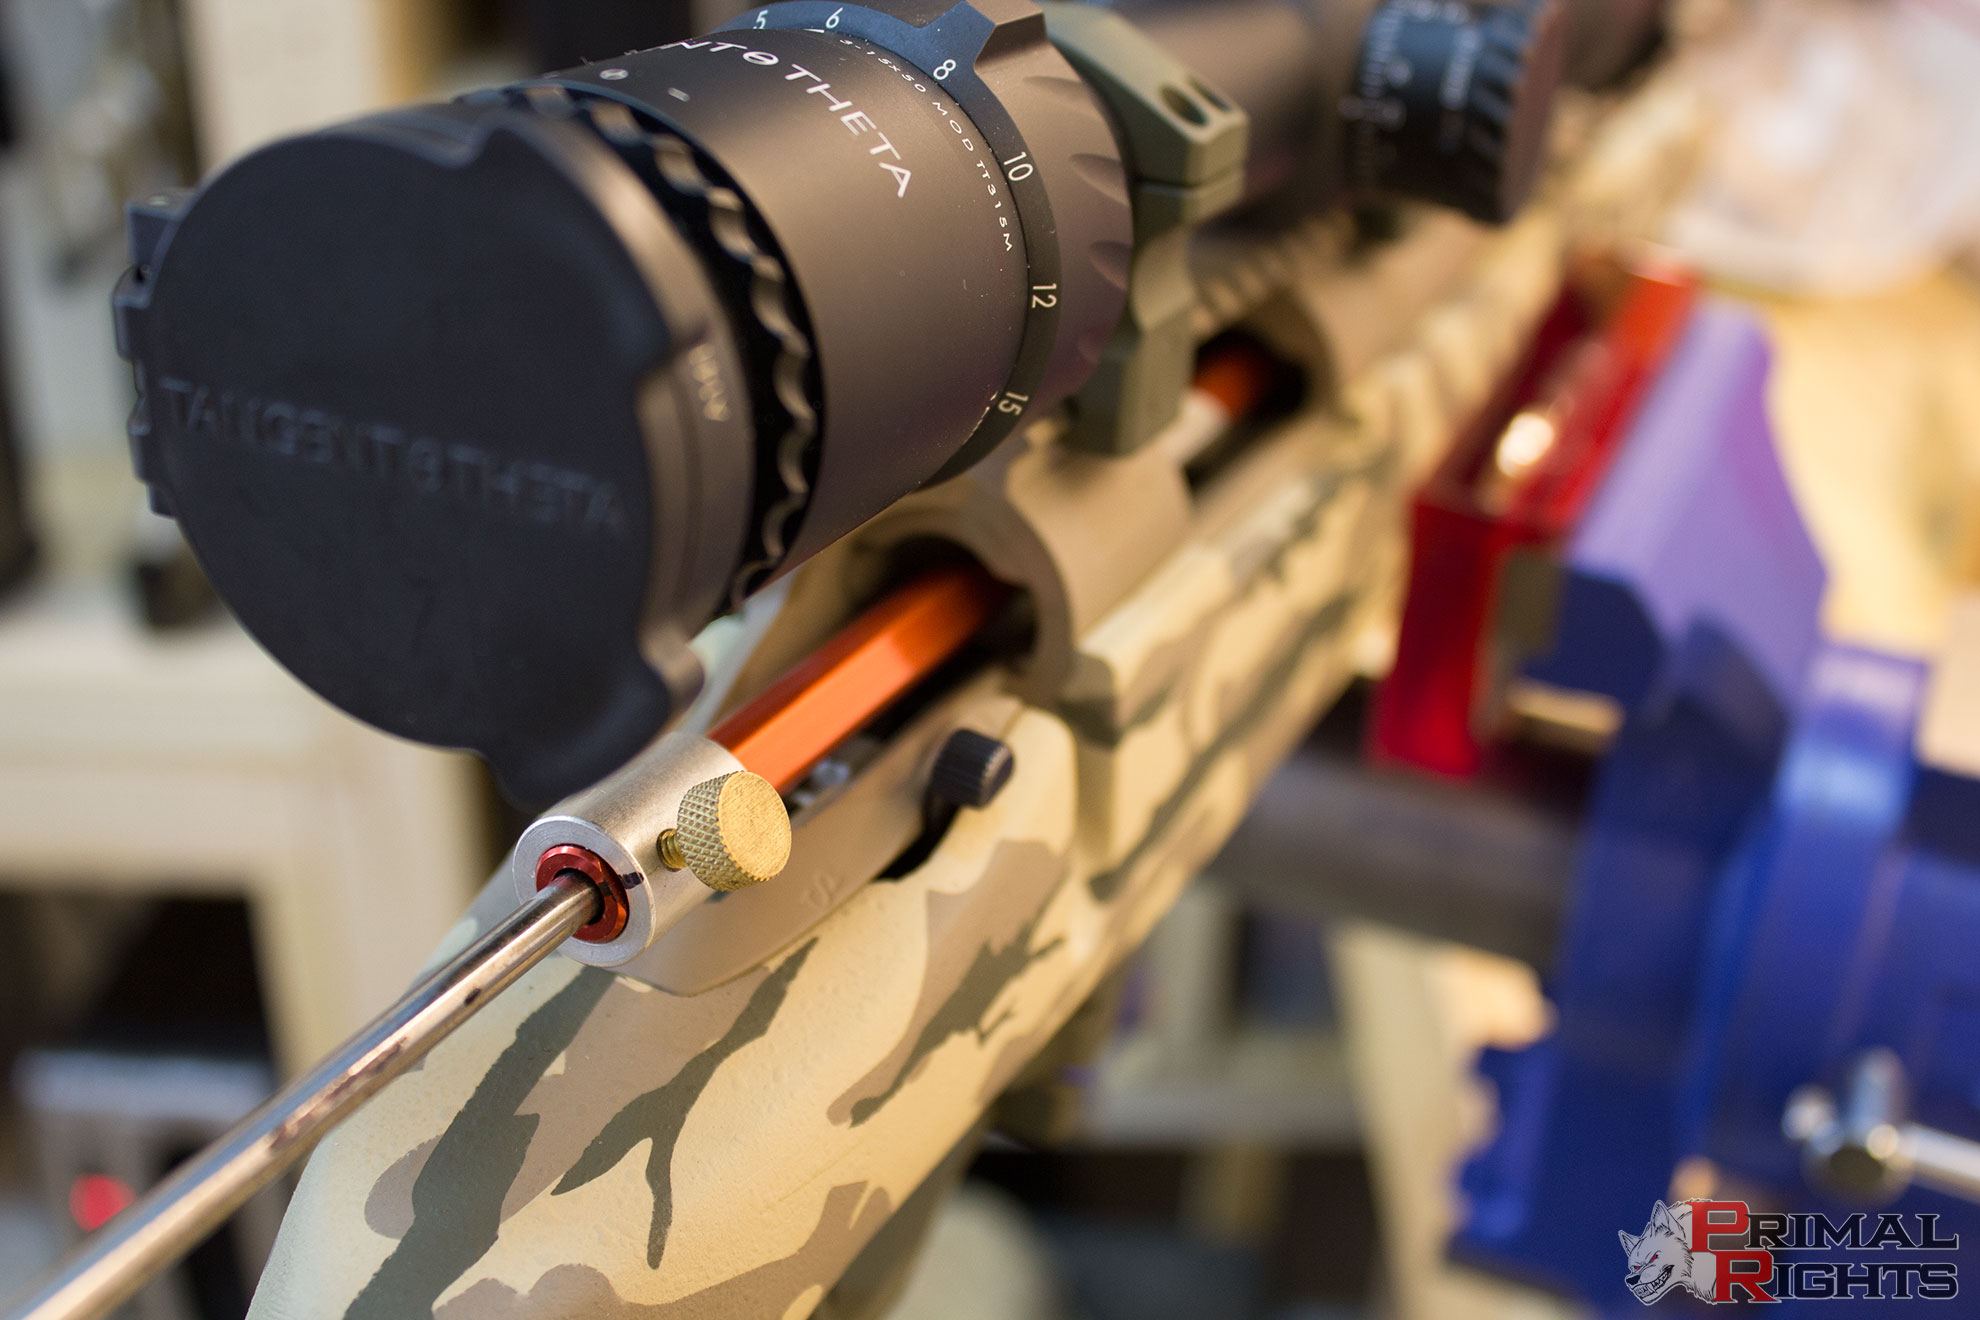
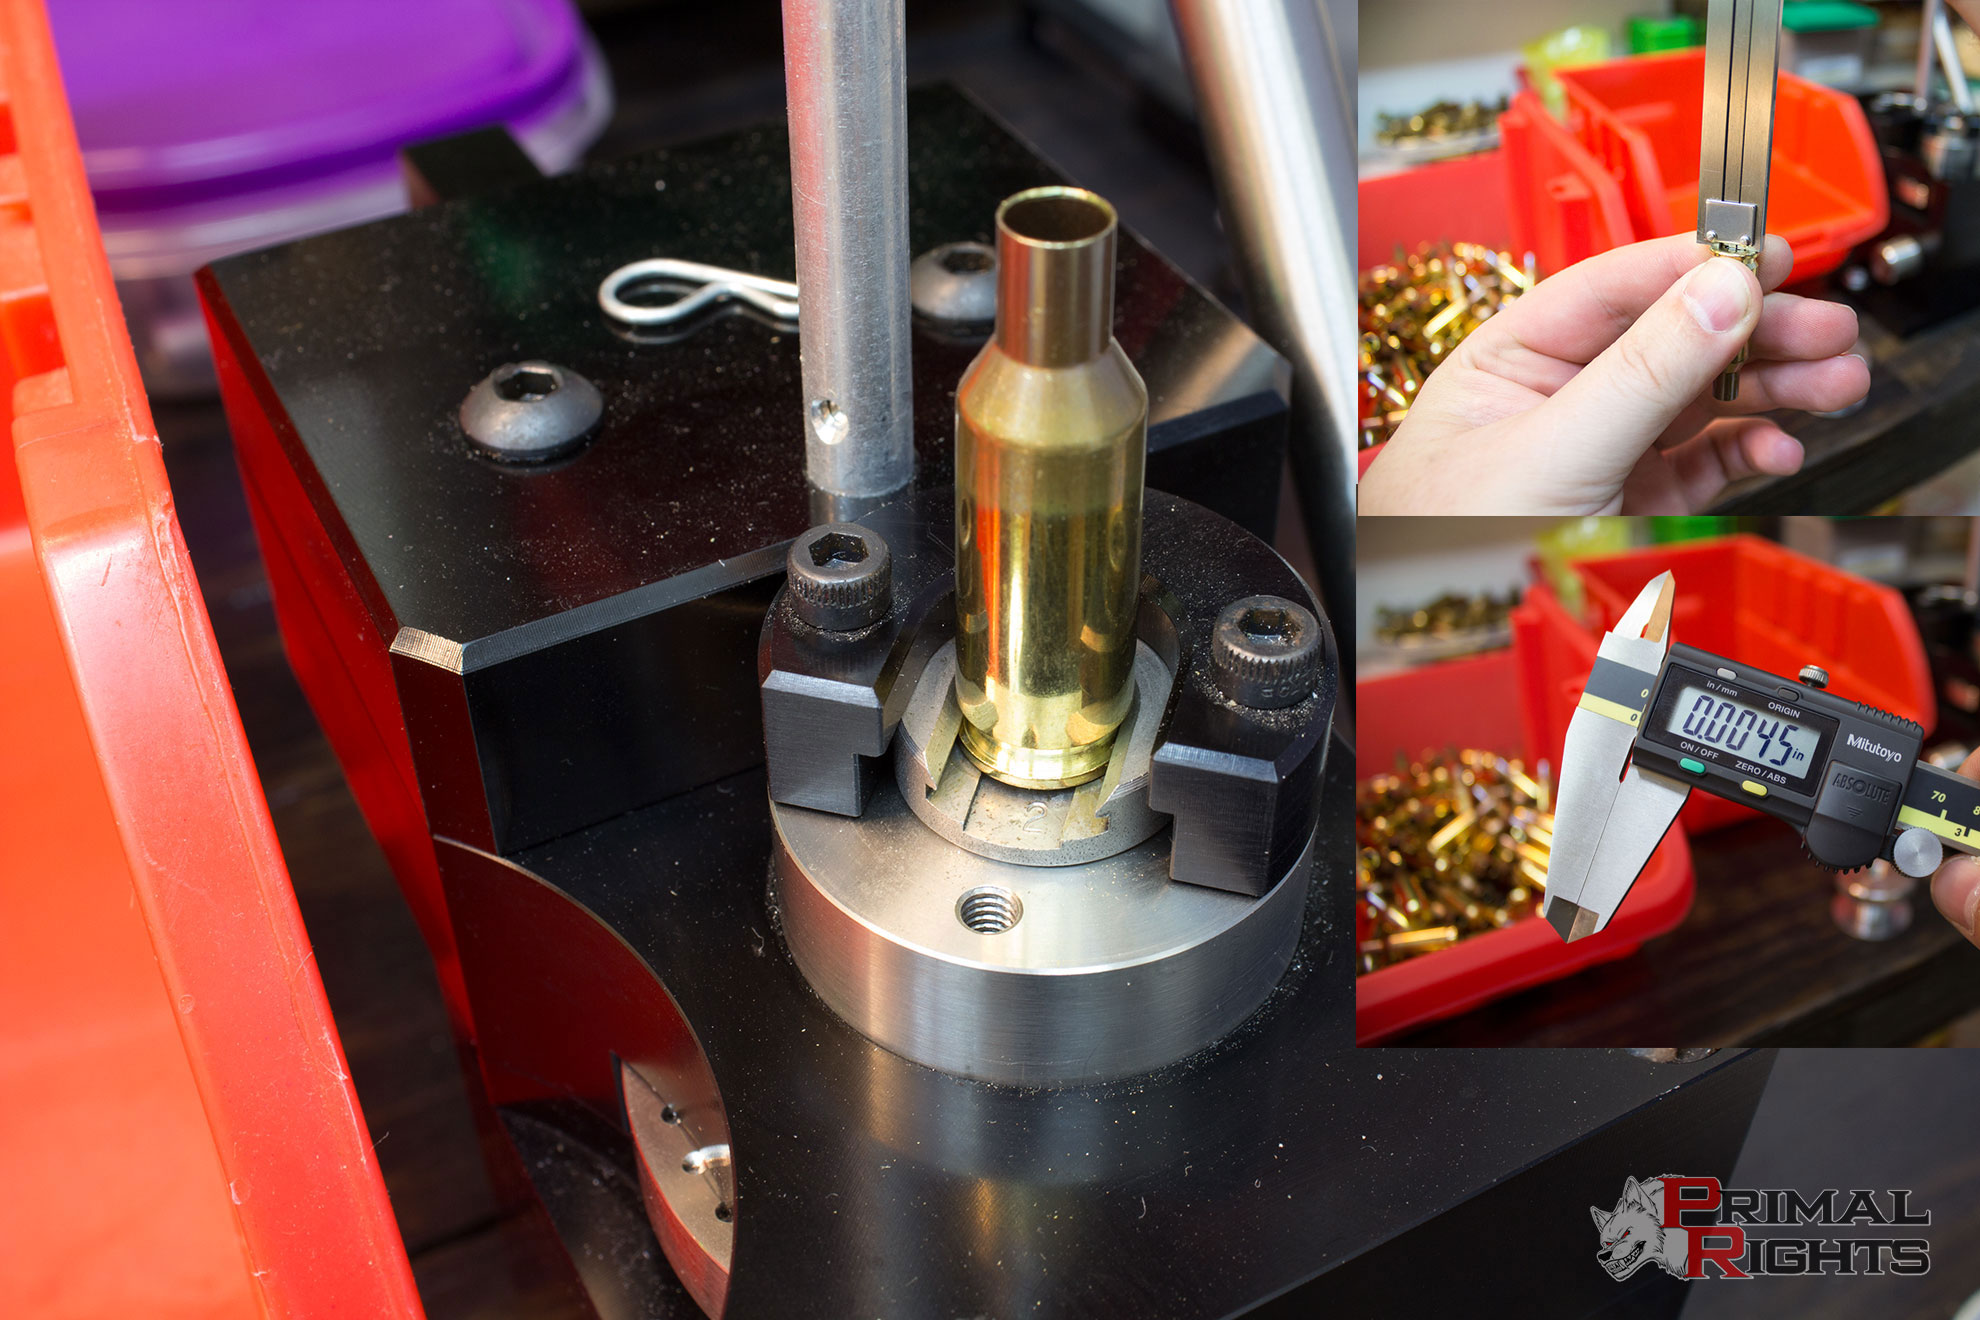
The first step is to learn the boundaries of the testing. To do this, we need to learn about your rifle's chamber. Specifically, the distance between the bolt face and the lands in your barrel. There are several tools available to achieve this. Currently I'm a proponent of using sinclair or hornady's OAL tool and bullet comparators. You use caliber-specific inserts and cartridge-specific modified cases which allows you to manually push a bullet up into the lands. You then lock the push rod in place, remove the modified case and bullet, and take a measurement using a bullet comparator attached to your caliper. This is an imperfect method, but it is probably the easiest way to get the measurement you need for most of you. It takes a bit of feeling and technique to get consistent readings. Don't get frustrated. Just keep working at it until you start getting a feeling for how to run the tool. Once you do, take 10 readings, writing down your results from each reading. If you are getting a variance of more than 5-10 thousandths, you're going to want to work on that technique some more. Once you get it down, you will want to take an average of the measurements you have. That number is your length to lands. For simplicity, I will typically take the smallest whole number, as that will be easier to work with. Remember, there is a lot of technique to all of this. Not only to using the push rod on the bullet, but also when using the bullet comparator and caliper. In the image below you can see I got a measurement of 1.788" on one specific reading. That was the longest measurement I got, with 1.786 being the shortest. So I wrote down a length to lands measurement of 1.785 inches, as I can be certain that measurement will not touch the lands even if there is a slight variation.
Ensure the comparator is installed on the caliper correctly, allowing the modified case and bullet to sit straight up and down in relation to the caliper. If it is installed wrongly, it will produce faulty readings. There is a right and wrong way for the comparator to be configured as well as a right and wrong way to attach it to your caliper. Make sure you get it right!
Another very important factor to remember is that the length to lands measurement will vary depending on what bullet you use to take the measurement. Different bullets have differently shaped ogives and thus will intersect the hole in the comparator at different locations. It is important to take the measurement to lands with the specific make and model of bullet you intend to use for this specific load development session.

After discovering the length to lands in your specific chamber, you need to get some ammo loaded. Doing a load development session on a brand new barrel will be completely pointless. The first few rounds through a barrel change it pretty drastically. The reality is that you can't truly trust a barrel until it has a couple hundred rounds on it. We do not need to fire that many rounds to get started here though. At least 20 rounds are needed in order to smooth out the early round jitters. This will get the barrel seasoned in a bit and allow you to get a cleaning on it. These first few rounds can be fired using factory ammo if you wish, but I like to use handloads. These early rounds can tell you some things about your processes, but it is really personal preference. If you want to use factory ammo, just buy a box of 20 and launch them at a target of your choosing at a cadence you prefer! You can use these first rounds to get a relative zero on your optic. Understand that as the barrel changes a bit, so will your zero. So don't be real concerned if your zero floats around during these early rounds.
If you want to handload your first rounds, you'll need a start load. A start load should be a nice mild load on the low end of the spectrum of powder charges for your selected components. These start loads can be found in reloading manuals and various sources on the internet. Gunhive.com has a great resource for selecting and evaluating potential loads based on your component selection. Browse to the Load Data section of the site and take a look at what others are using. Be sure to subtract a good deal of powder to ensure you don't start with a hot load in your rifle.
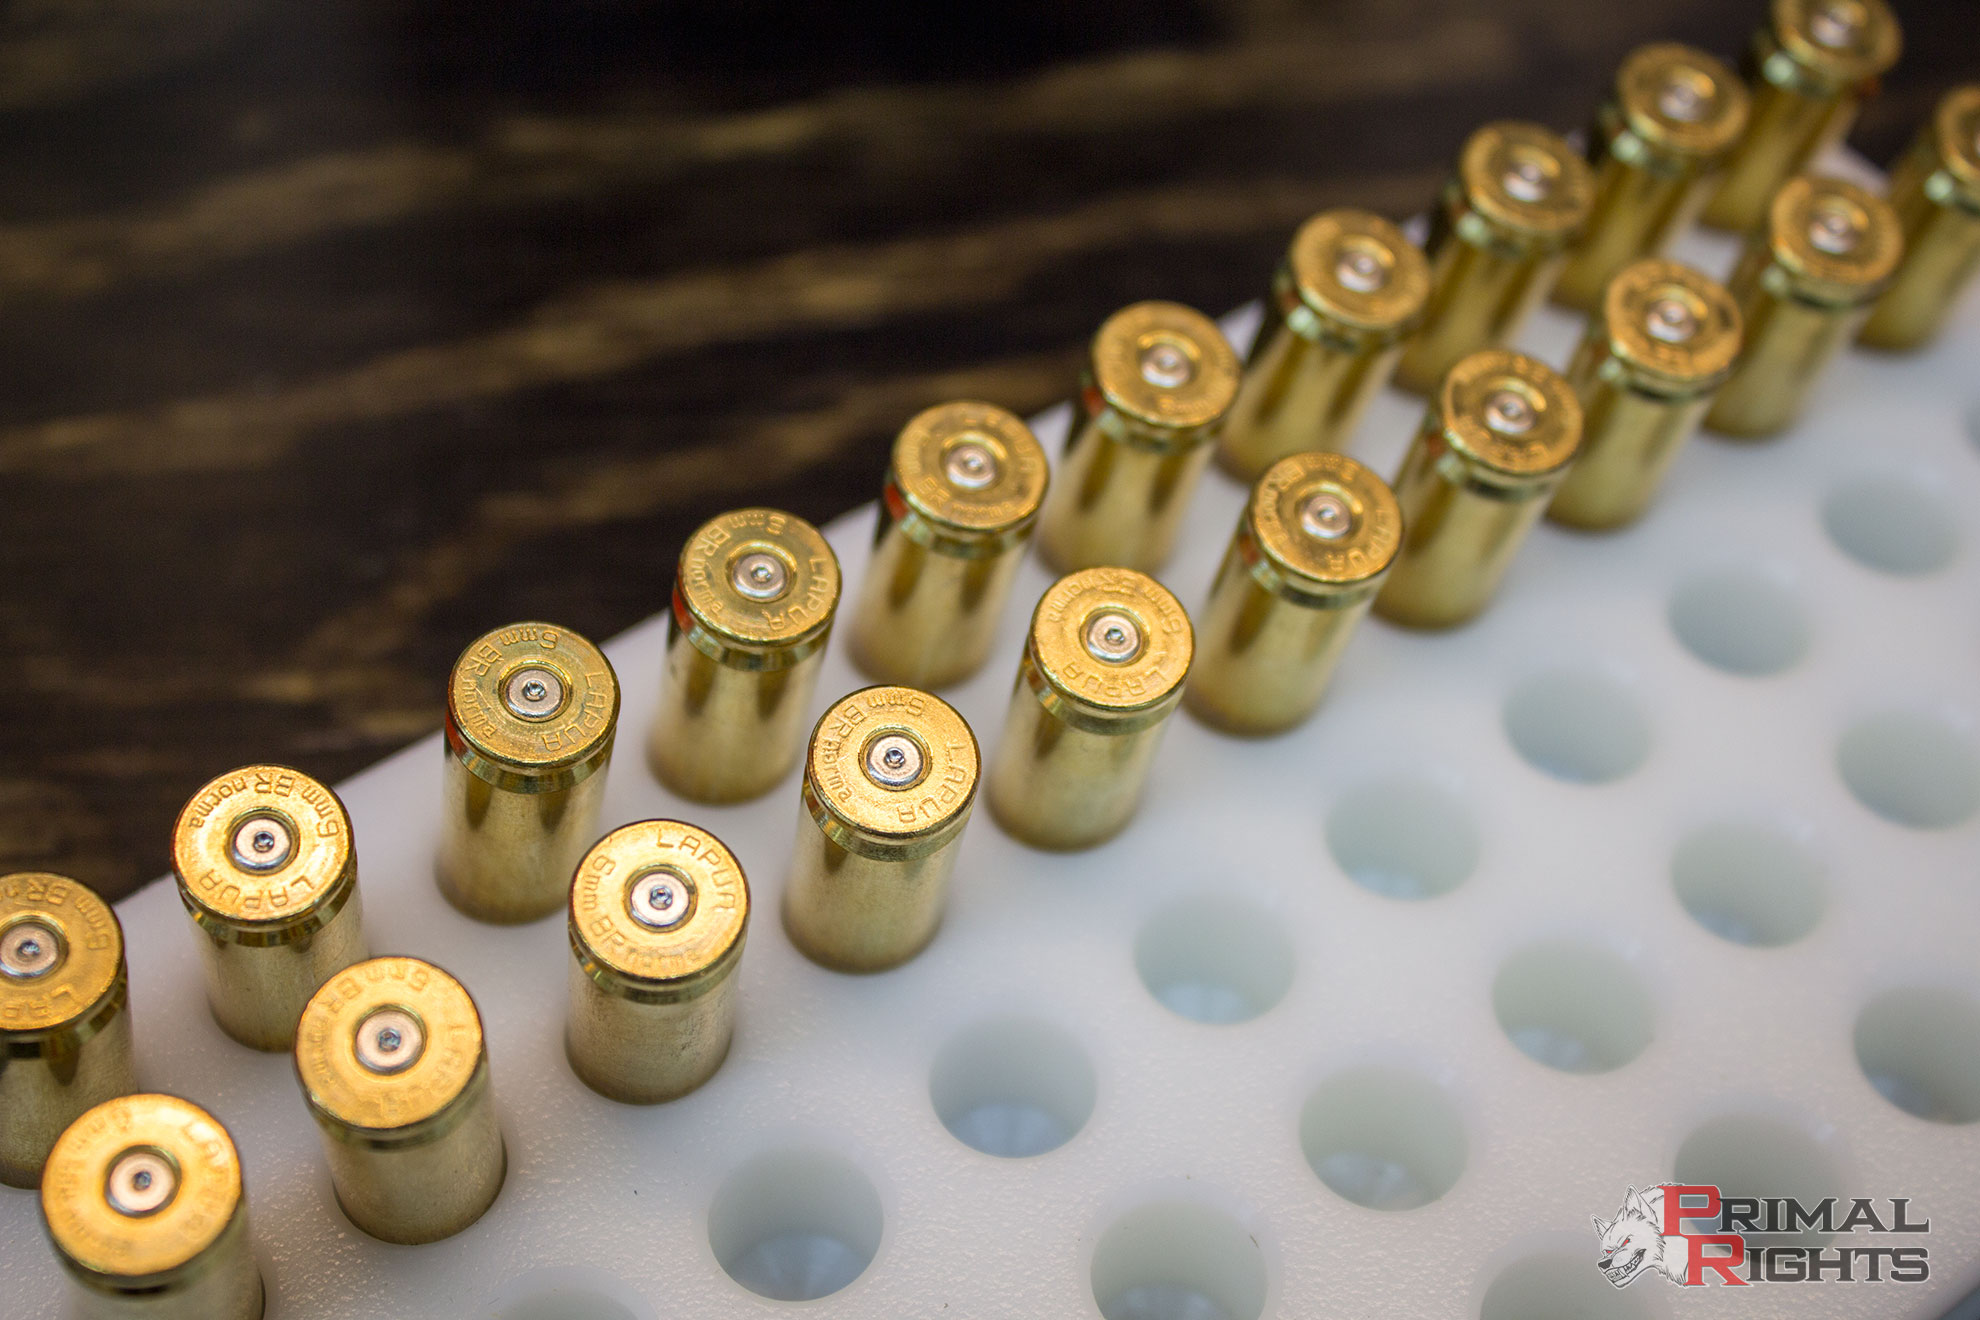
I recommend loading no more than 30 rounds for your initial batch of barrel stabilization rounds. 20 is usually sufficient. As those first few rounds go down the tube, they will be leaving quite a lot of fouling behind. If this fouling is left unchecked, it can lead to premature pressure and false data. Beginning a load development session before the barrel has been shot at least 20-30 times is generally going to provide completely useless results which will never be able to be replicated as the barrel is shot. Since I'm working with a 6BR and 95gr VLD's, I will be starting with a 29gr charge of Varget. Based on my research on my components, most guys are running into their loads somewhere north of there around 30-32gr. This starting charge weight requires a bit of experience to gain an instinct for. The key is to make sure your first rounds are not going to be drastically over-pressure. If you are pretty new to reloading, you may want to load one case at a time until you are sure you won't be getting pressure.
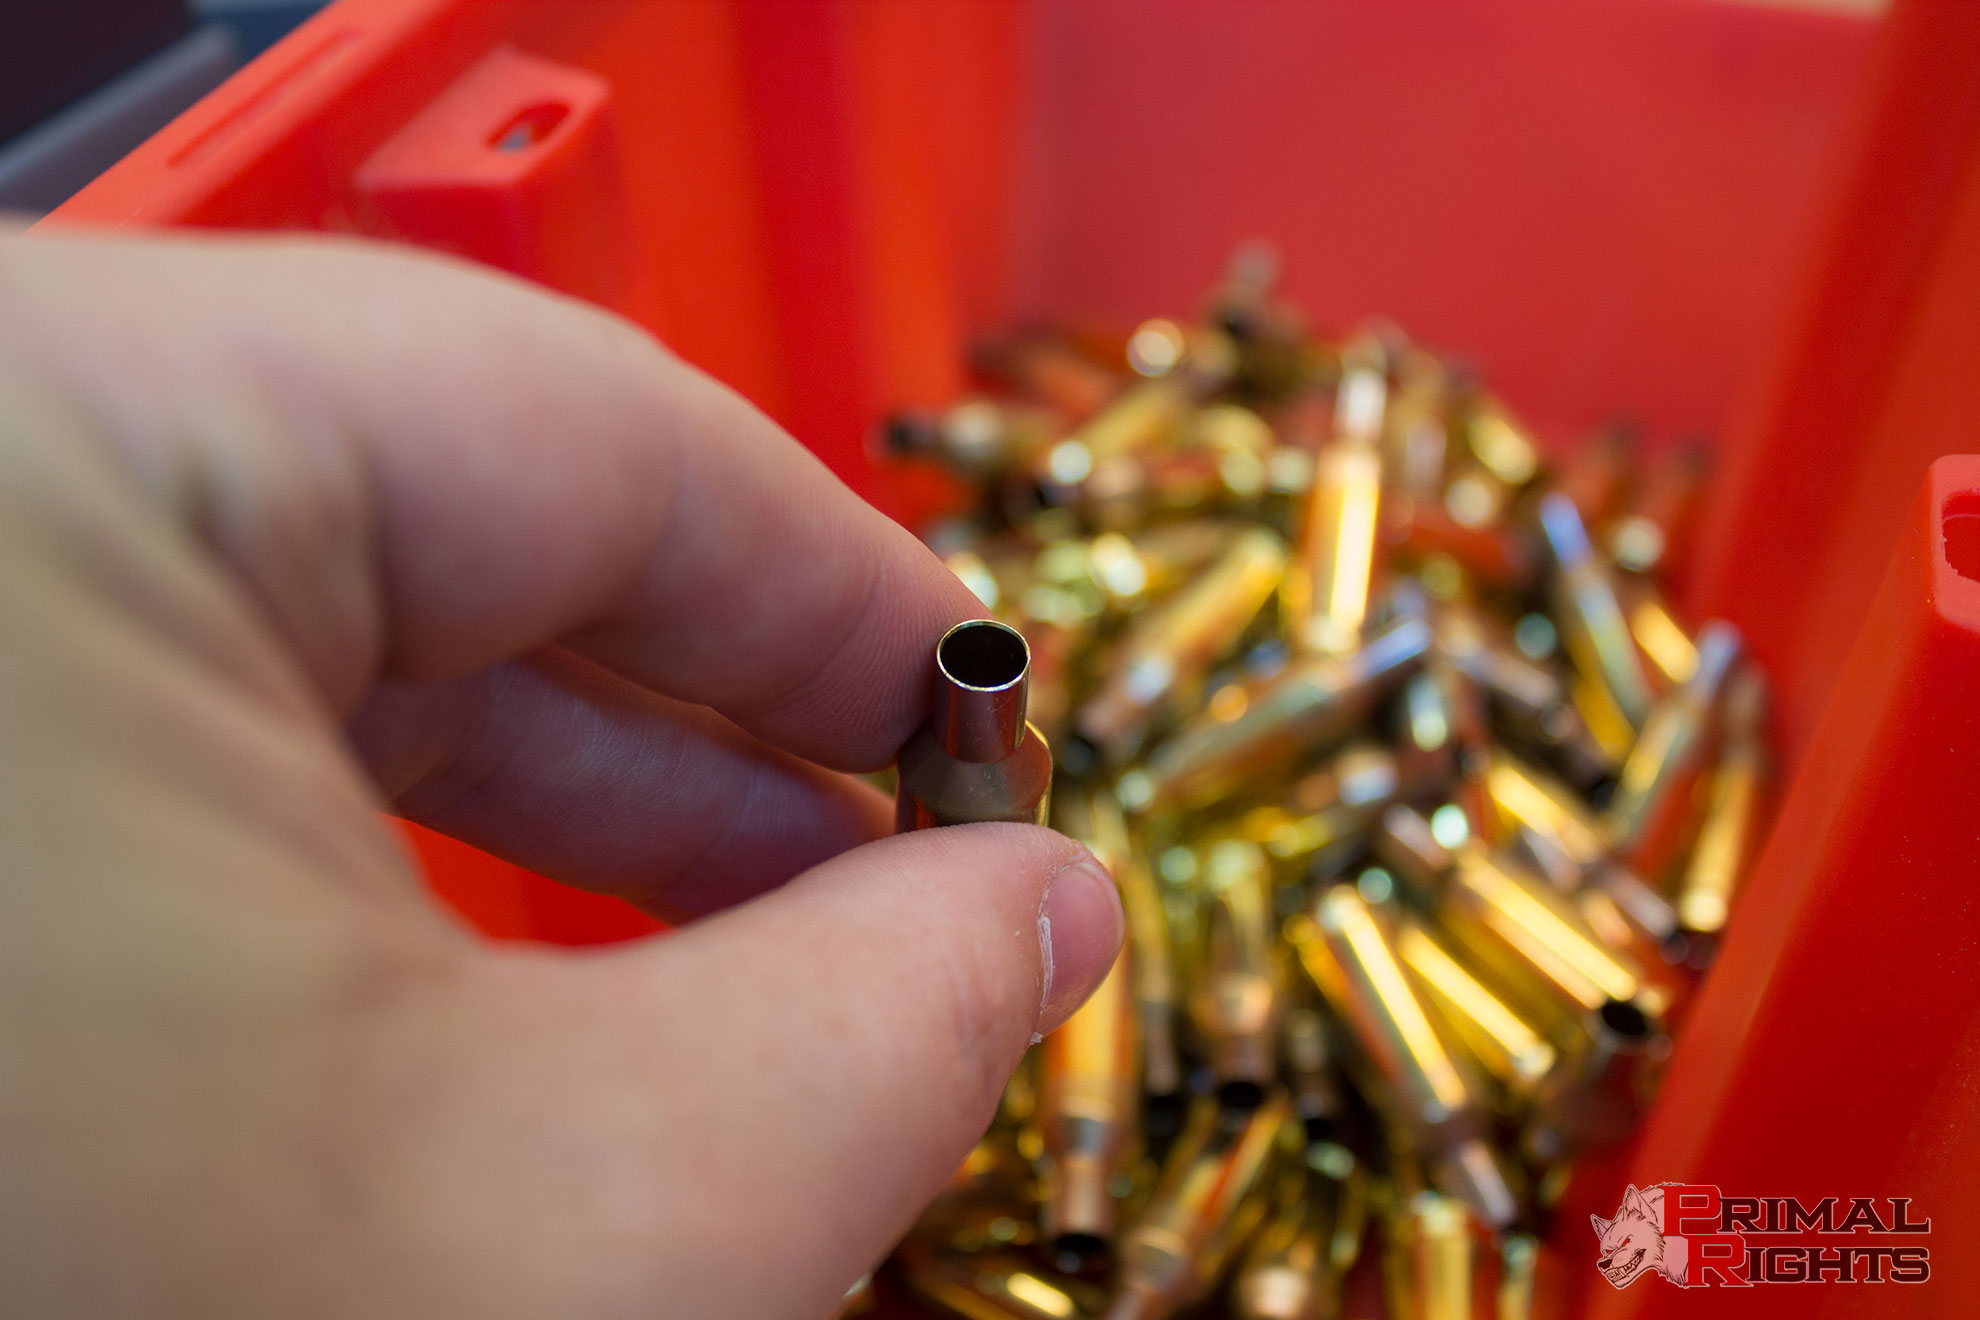
You'll often be working with new virgin brass when doing this testing, which presents its own set of problems. After you get a firing on the brass, it will likely change its internal volume a bit, which can negate some of the work done during this first load development session. It's always a good idea to verify your OCW after each firing on the brass to ensure you are still in your node. The quality of your brass will determine what steps you need to take on the virgin brass. Brass prep and other more detailed aspects of general precision rifle reloading are outside the scope of this article. We'll cover a couple basics quick.
Make sure you get a good ID chamfer on your case mouths. Inspect them for roundness while you are at it. I like to use a lyman case prep center for this work on virgin brass. You can pick them up for around $120 from Precision Reloading and they are a great tool to have on your bench. You are looking for a nice round neck/mouth with a clean chamfer to ensure the bullet jacket is not damaged when seating.
Make sure you seat a primer before you go throwing powder. That is unless you like ammo that doesn't fire and a messy bench! Primer selection is generally not super important at this stage of the game. After we get through a few rounds of testing, then you can come back and work on primer brand/type. For now, just make sure you feel them seat firmly in the pockets and try to get them all at the same depth. With the CPS, this is pretty simple. I just take a measurement of how thick the primers are, how deep the pockets are, and recess the primers to the specific thousandth of an inch that I desire. Primer seating depth uniformity is one of the factors that play into velocity extreme spreads. Take your time and do it right.
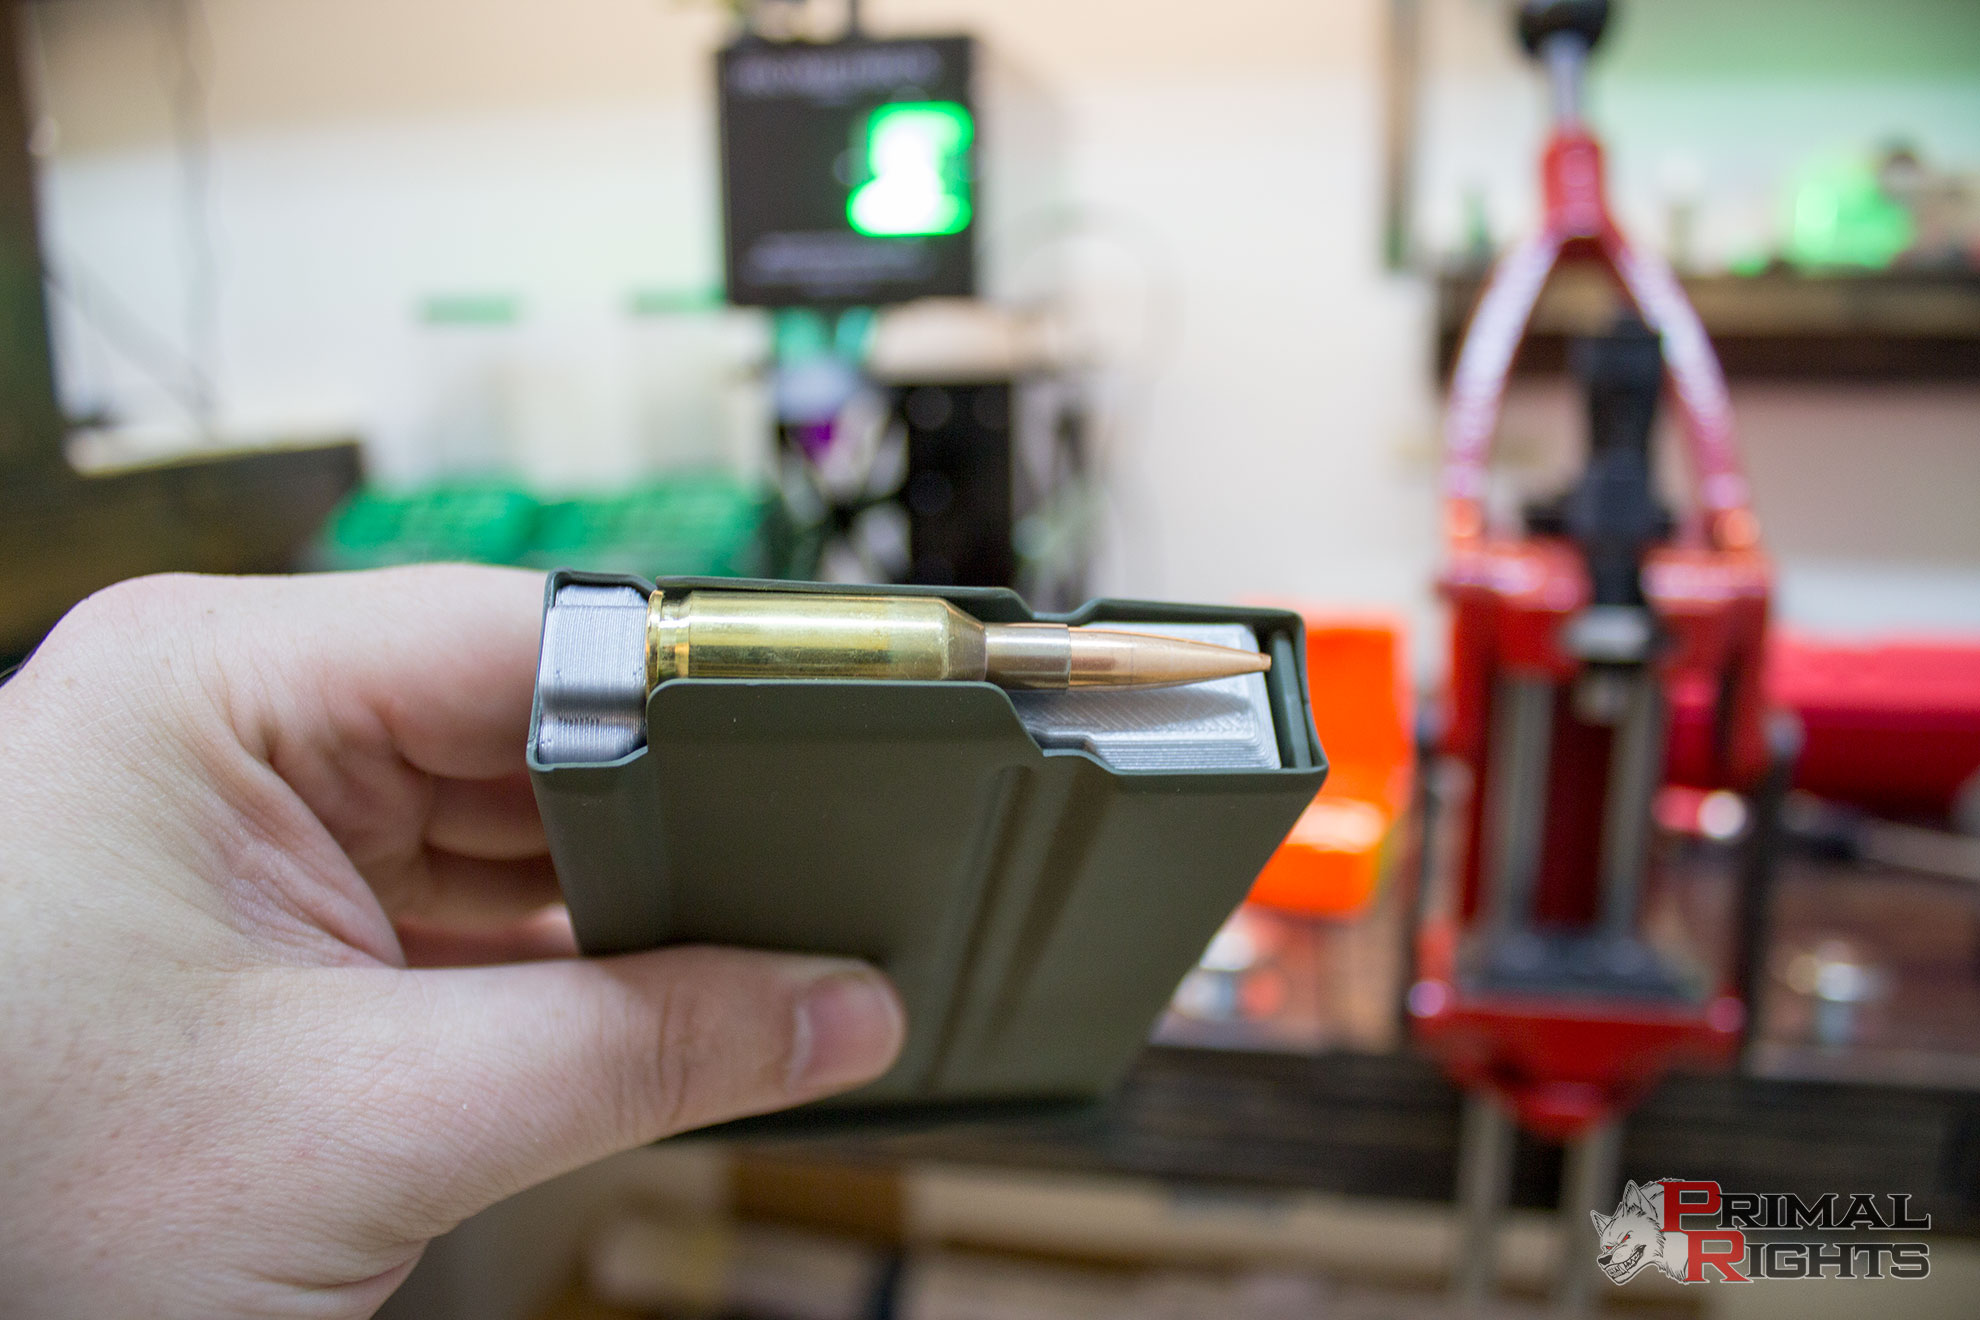
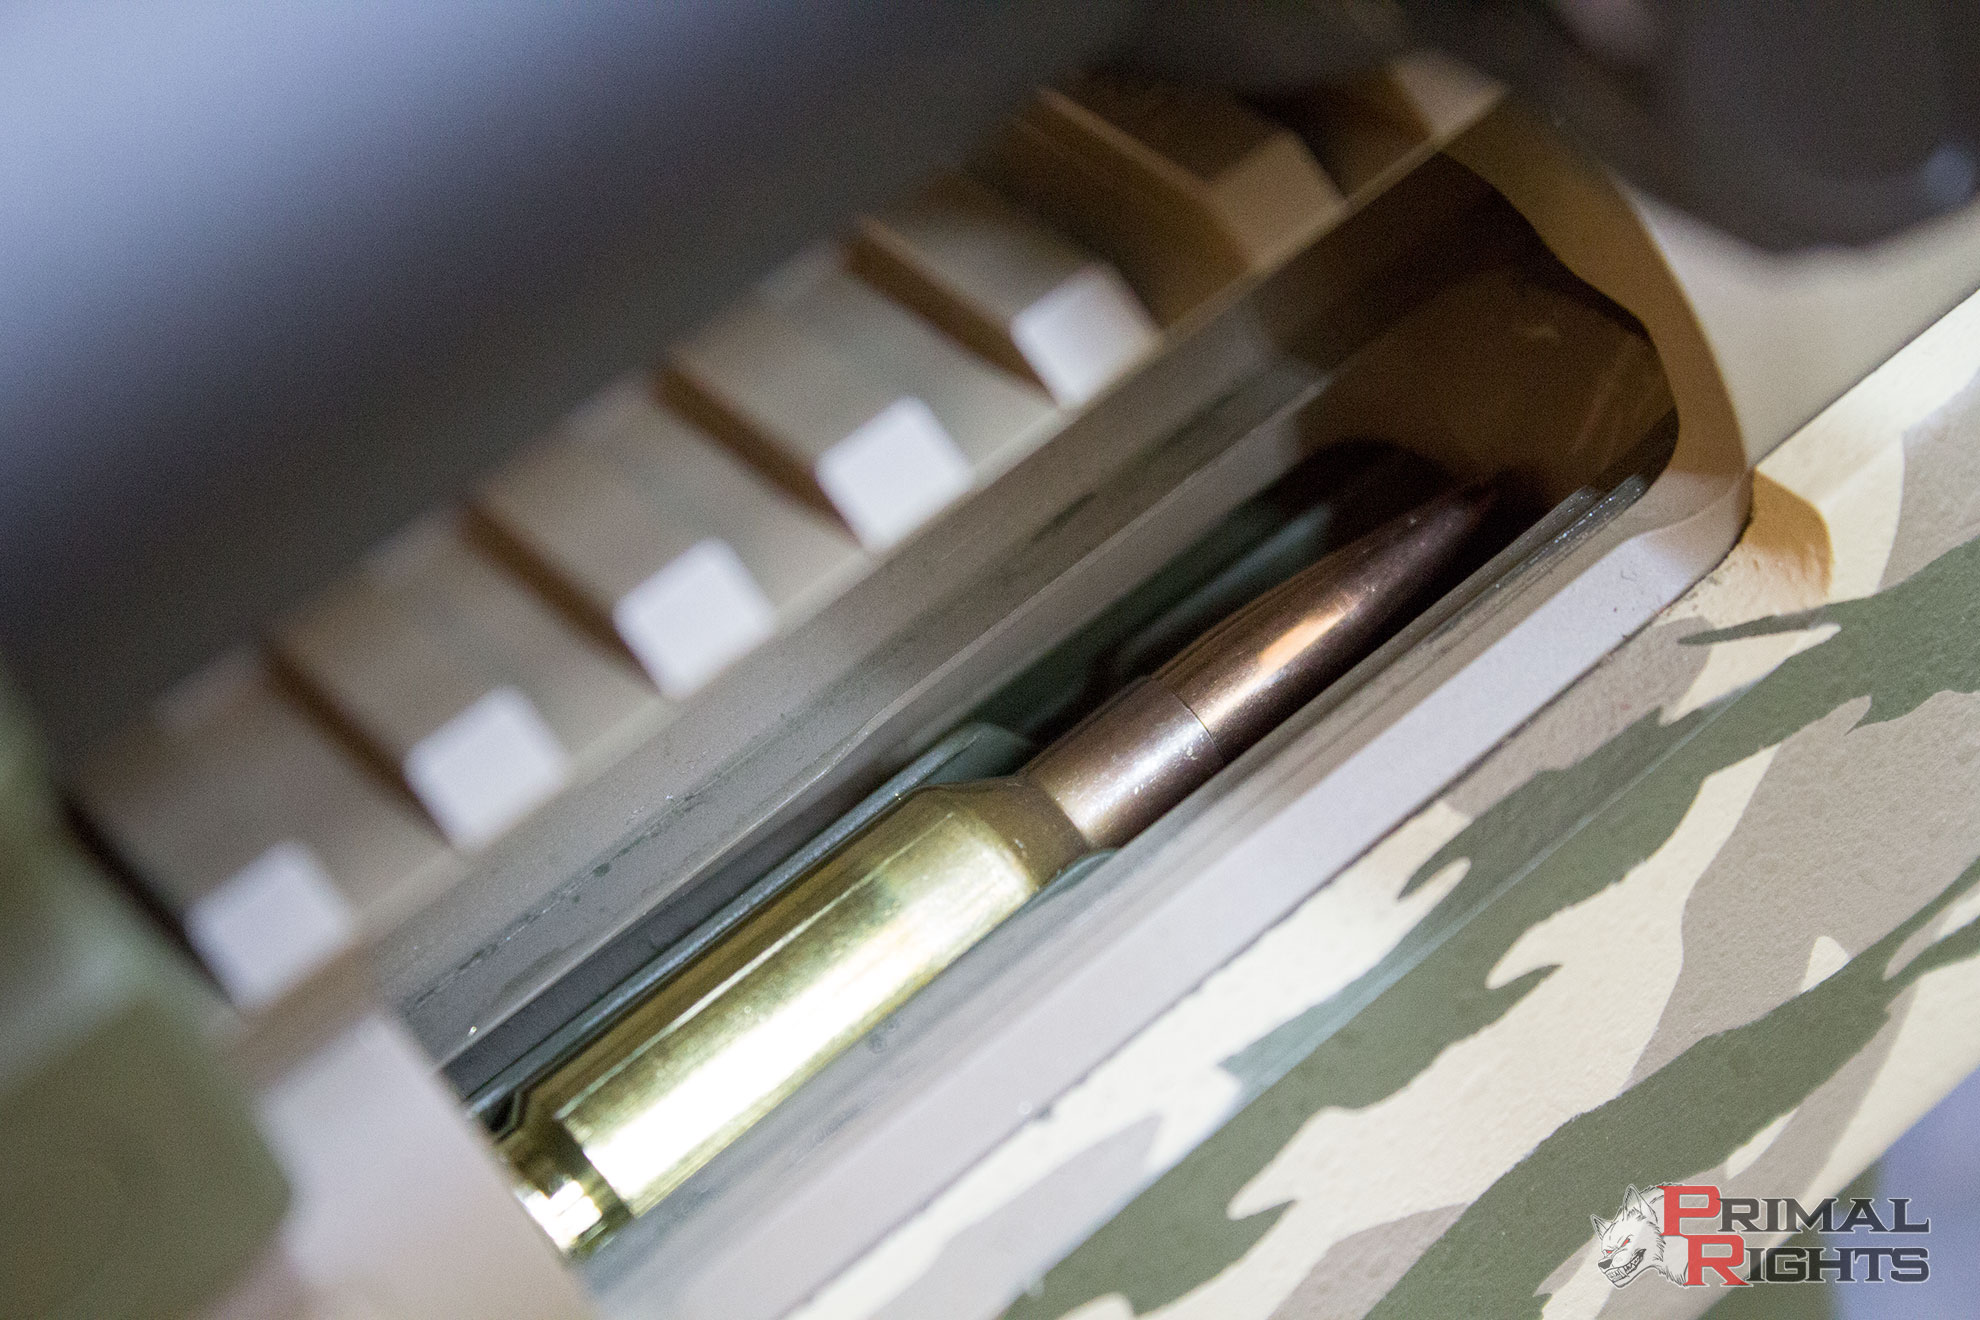
We now have prepped and primed brass, with a starting charge in mind. All that's left is to determine where we want to seat that bullet. We already discovered the length to lands and took a base to ogive measurement at that location earlier. Your starting seating depth will depend upon a few factors. Just because we know where the lands are, doesn't mean we can seat bullets that far out. What about our magazine? On custom rifles, it's pretty common to be able to seat the bullets into the lands from magazine length if you want. However, some rifles such as factory remington 700's, are notorious for having extremely long throats which are nearly impossible to reach. If the rifle is a single shot, you won't have to worry about magazine length. Another factor to consider is how well the bullet will be held by the case. This is referred to as projection length. The bearing surface of the bullet that actually comes in contact with the case is what we're looking for here. The rule is at least one caliber of contact. So if you are shooting a .243 Win, you'll want at least .243" of the bullets bearing surface in contact with the case neck. This rule can be bent a little, depending on your specific rifle. For semi-auto's you are going to want all of that contact and perhaps even more depending on how rough a journey the round will be going on from the magazine to the chamber. If you don't have enough contact or enough neck tension there, the bullet will get seated deeper into the case upon loading, which can result in dangerous over-pressure. If you are single-loading by hand directly into the chamber, you can go with very light seating force and the bullet will stay put.
The 6BR I'm working with in this article is setup with a Surgeon DBM, so I definitely want to feed from the magazine. I typically like to start about ten thousandths off the lands when I begin load development. This gives me the most room in the case to work with, and most often I find that I don't really have to move that much at all for optimal loads. I set my seating die long, and sneak up on my desired base to ogive measurement, which in this case is 1.775 inches. Once I have a case seated there, I will grab that round and ensure it fits in my magazine. After all, starting load development with a round that doesn't work in the mag is a relatively pointless endeavor! Once I see it fits in the mag, I'll ensure I can get the loaded mag into the rifle. After that, I'll chamber the round to make sure there is nothing else that is going to prohibit me from using the rounds setup like this. These are crucial steps to ensure you aren't crippling yourself at a later point. You don't want to load up 10 or 20 of these, if you can't even use them. You can see in these images below that even with the Primal Rights 6BR AICS conversions installed, there is plenty of room in front of the bullet to ensure they can be loaded and fed from the magazine. Once you have determined that everything is green for go, get 20 rounds loaded up.
If you enjoyed this article, please use the image link below to go shop on amazon.com. When you click the banner, Gunhive.com will get credit for your purchases made within 24hrs of using the link. There is no risk to you, and you are not forced to buy anything. However, if you do happen to need something from Amazon.com, using this link to go to Amazon to make your purchases helps Gunhive.com to provide their great services for shooters!
Pay close attention to these first few rounds through your rifle. This is not a sport that forgives error. Unless you like taking trips to the ER, you better be deliberate and precise when loading new components for a new rifle. There is not much of known quality in this entire equation. To much new, and not enough old and trusted. So, keep your safety glasses on, eyes open, and brain engaged. Before firing these first rounds, make sure you clean the rifle very well. Strip it down completely and make sure there are no hidden mechanical issues. If you are not qualified to do that, then get it to a competent gunsmith to be checked over. Firing a rifle for the first time should be approached with caution. Make sure you clean the barrel well. During manufacturing of the blank, and when the barrel is chambered and installed, there was most likely machine coolant running down the bore. Good smiths will usually run a patch or several down the bore before delivering the rifle to you, but this isn't something you should count on. Make sure you clean the bore to ensure all that machining gunk and metal chips are completely out of the bore. Failure to do so can cause those nasty bits to be embedded in the bore permanently.
Depending on how skittish you are about this whole business, and how much you value your eyeballs and facial features, you might want to take the first shot through the rifle behind cover. A little string tied around the trigger will do the trick! If it takes the first round without grenading, you're usually good to go. Eject that round and inspect the case for pressure and any oddities. If you see something to cause alarm - STOP! Do not just keep hammering rounds down range thinking it will fix itself. Know what you are doing, before you do it. If you don't know what you are doing, enlist the help of someone who does. The Gunhive.com Forums are a great place to find those folks.
If you aren't seeing anything to cause alarm, then go ahead and keep firing your way through that first 20 rounds. Make sure to inspect each round before firing the next. New barrels are like spoiled teenagers during these first rounds. They are often unpredictable and can give you all kinds of grief if you don't keep a constant eye on them. That barrel can foul up and pressure can spike to unsafe levels within a couple rounds. Next thing you know you'll have a blown primer and a trashed bolt on your new $1600 action. Don't be that guy. Don't be too worried if you start seeing pressure steadily climb as you approach 20 rounds. The bore will be fouling up pretty good by then. Just make sure the pressure doesn't get out of hand. If you're seeing nasty ejector wipe along with flat and cratered primers, you'll want to be stopping.
After you get those 20 rounds fired, it is important to clean your barrel really well. This cleaning after shooting the stabilization rounds will tell you a tremendous amount about your new barrel. If it is extremely fouled and takes a very long time to clean up, then you'll know you've got a pretty rough tube. If it cleans up easy with just a few patches, then you'll know you've got a really nicely lapped barrel. The latter is desirable and will typically have less clean bore POI shift than a rough barrel. Subsequently a nice smooth barrel will usually also require fewer fouler rounds to get that POI shift, if any, back to zero. These early bore stabilization rounds are critical to ensuring your load development session isn't a complete waste of time. A minimum of 20 is required in my experience, but you would not be wasting your time if you decided to fire another 20-30 after you finished this cleaning. Not only would another few dozen rounds go a long way toward settling the barrel down, you can also be working on fine-tuning your zero and getting used to how your new rifle feels. Getting some cycles on the action, checking tracking on your optic, fine tuning stock adjustments. All of this has value and requires some trigger time to get cornered. Pay attention to getting the most out of these early rounds. Have your goals set before you get behind the rifle and ride them out.
A brief interlude here for a moment. Now that we're firing live rounds, you are absolutely going to want to log these rounds. Data collection is one of the most under-rated and yet most important aspects of precision rifle shooting. Keeping an up-to-date and accurate databook will allow you to track the behavior of this barrel across time. If you don't keep track of how many rounds are fired, where they hit and why, when you clean the barrel, and what you see during those cleanings... you simply will not be able to explain various behaviors you may see several hundred rounds from now. Learning how to clean the barrel effectively, based on how many rounds it takes to foul out of accuracy, and how much effort it takes to clean, can only be done if you have an accurate accounting of the rounds fired. Physical databooks are fantastic for this. You should keep a databook for each specific rifle you have. I wrote an article many years ago about how to create your own databook rather than buying a pre-made one. That article is pretty old and could certainly use an update. Times change, and so does our methods as shooters. Now, you can very easily track your rifles performance by simply creating a profile for it on Gunhive.com. Once you configure the rifle and a barrel for it on your Gunhive.com dashboard, you can create specific range reports each time you fire the rifle. The twenty rounds that were fired above can be seen on this range report I generated at the time. If you follow that link you'll be taken directly to the specific range report. However, if you scroll around, you'll be able to see the rest of the barrel log as well, which is a record of every single round fired through this rifle to date. You can also see the cleaning reports I generated for it.
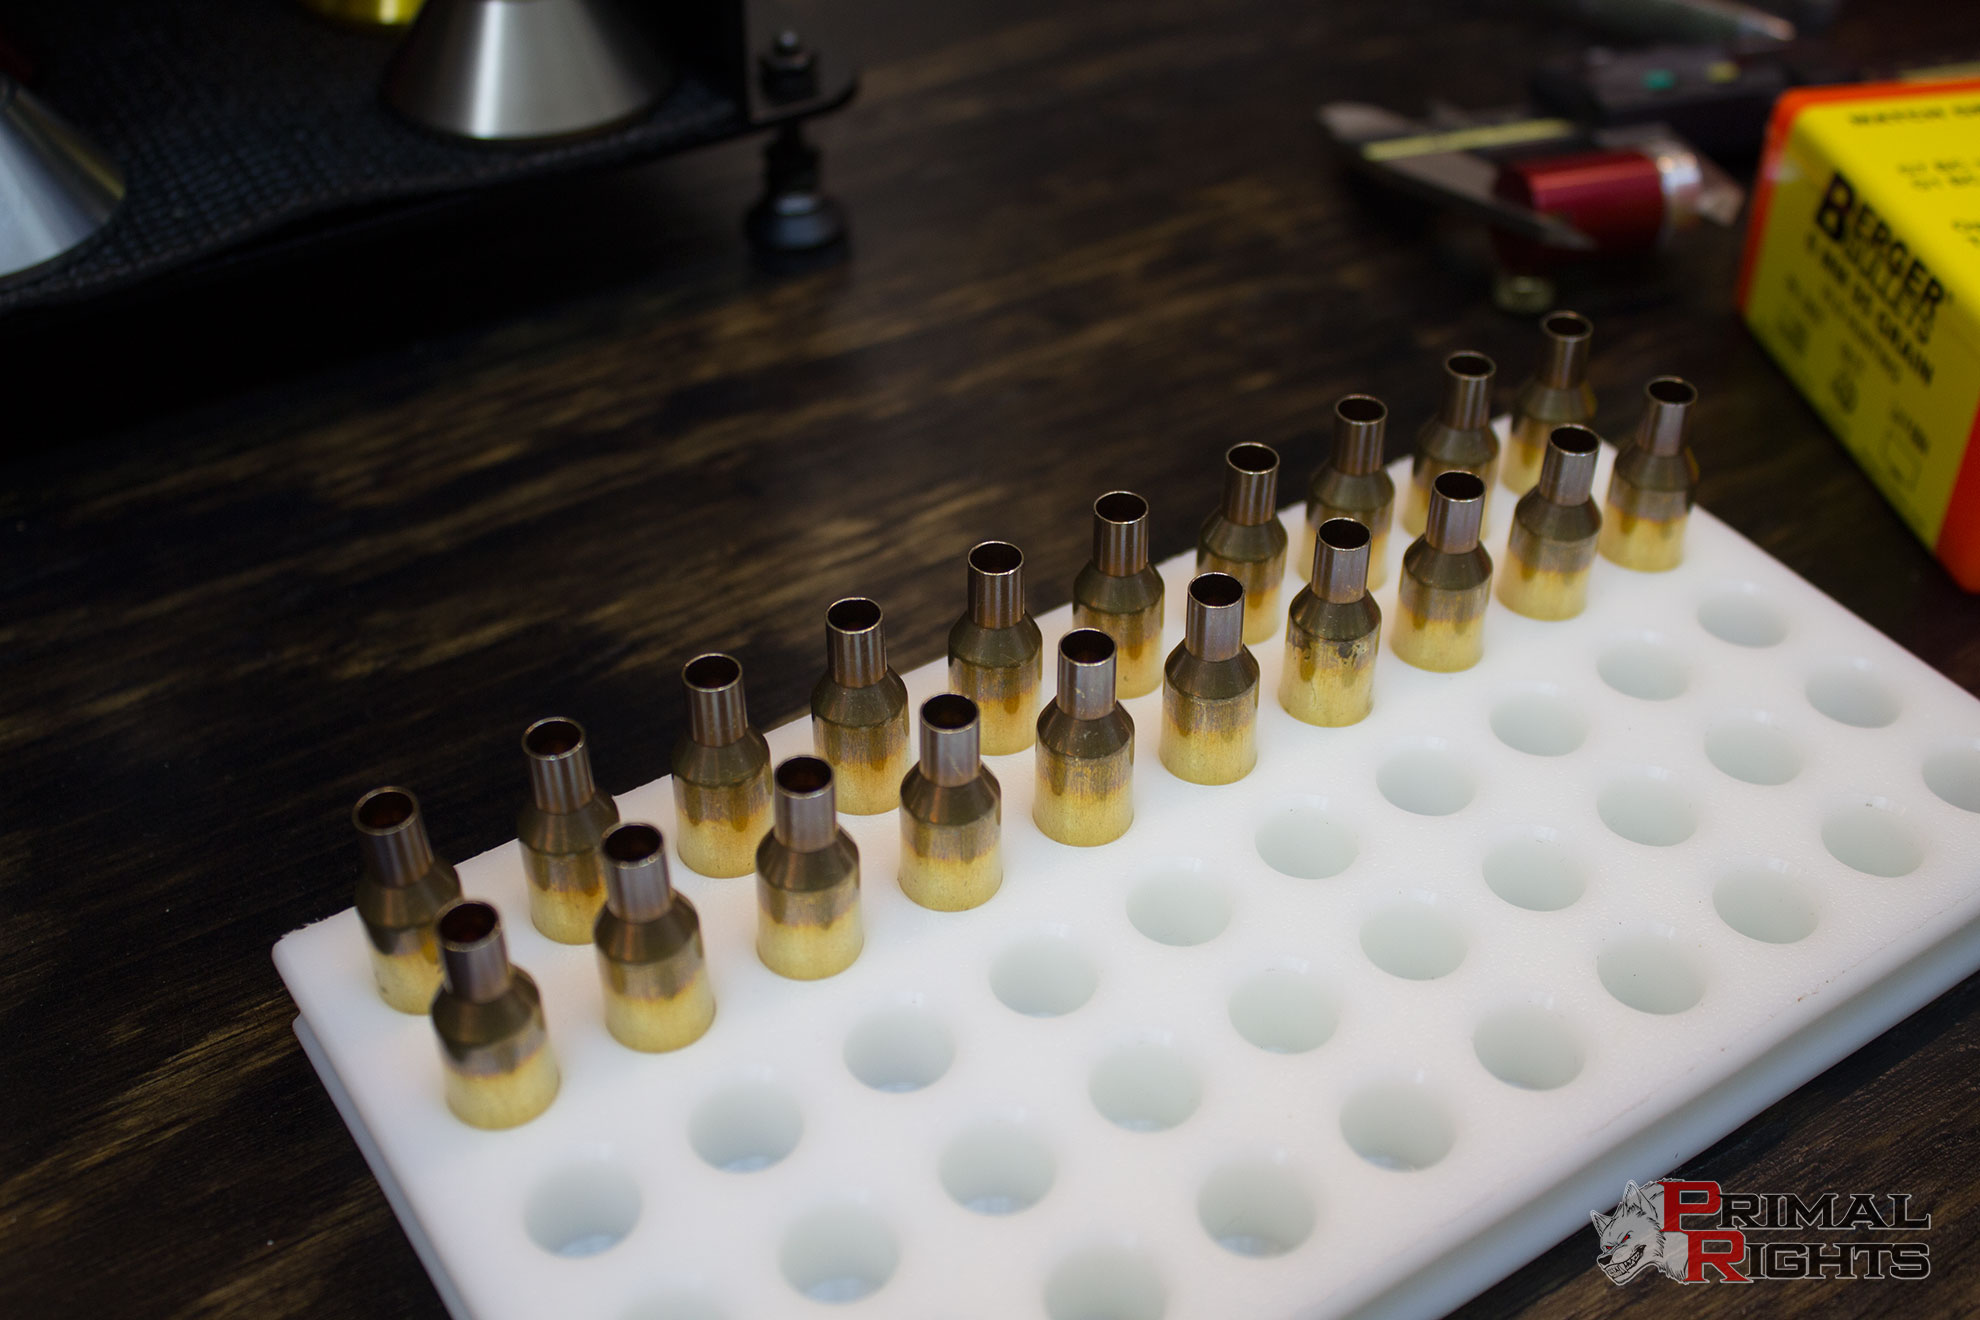
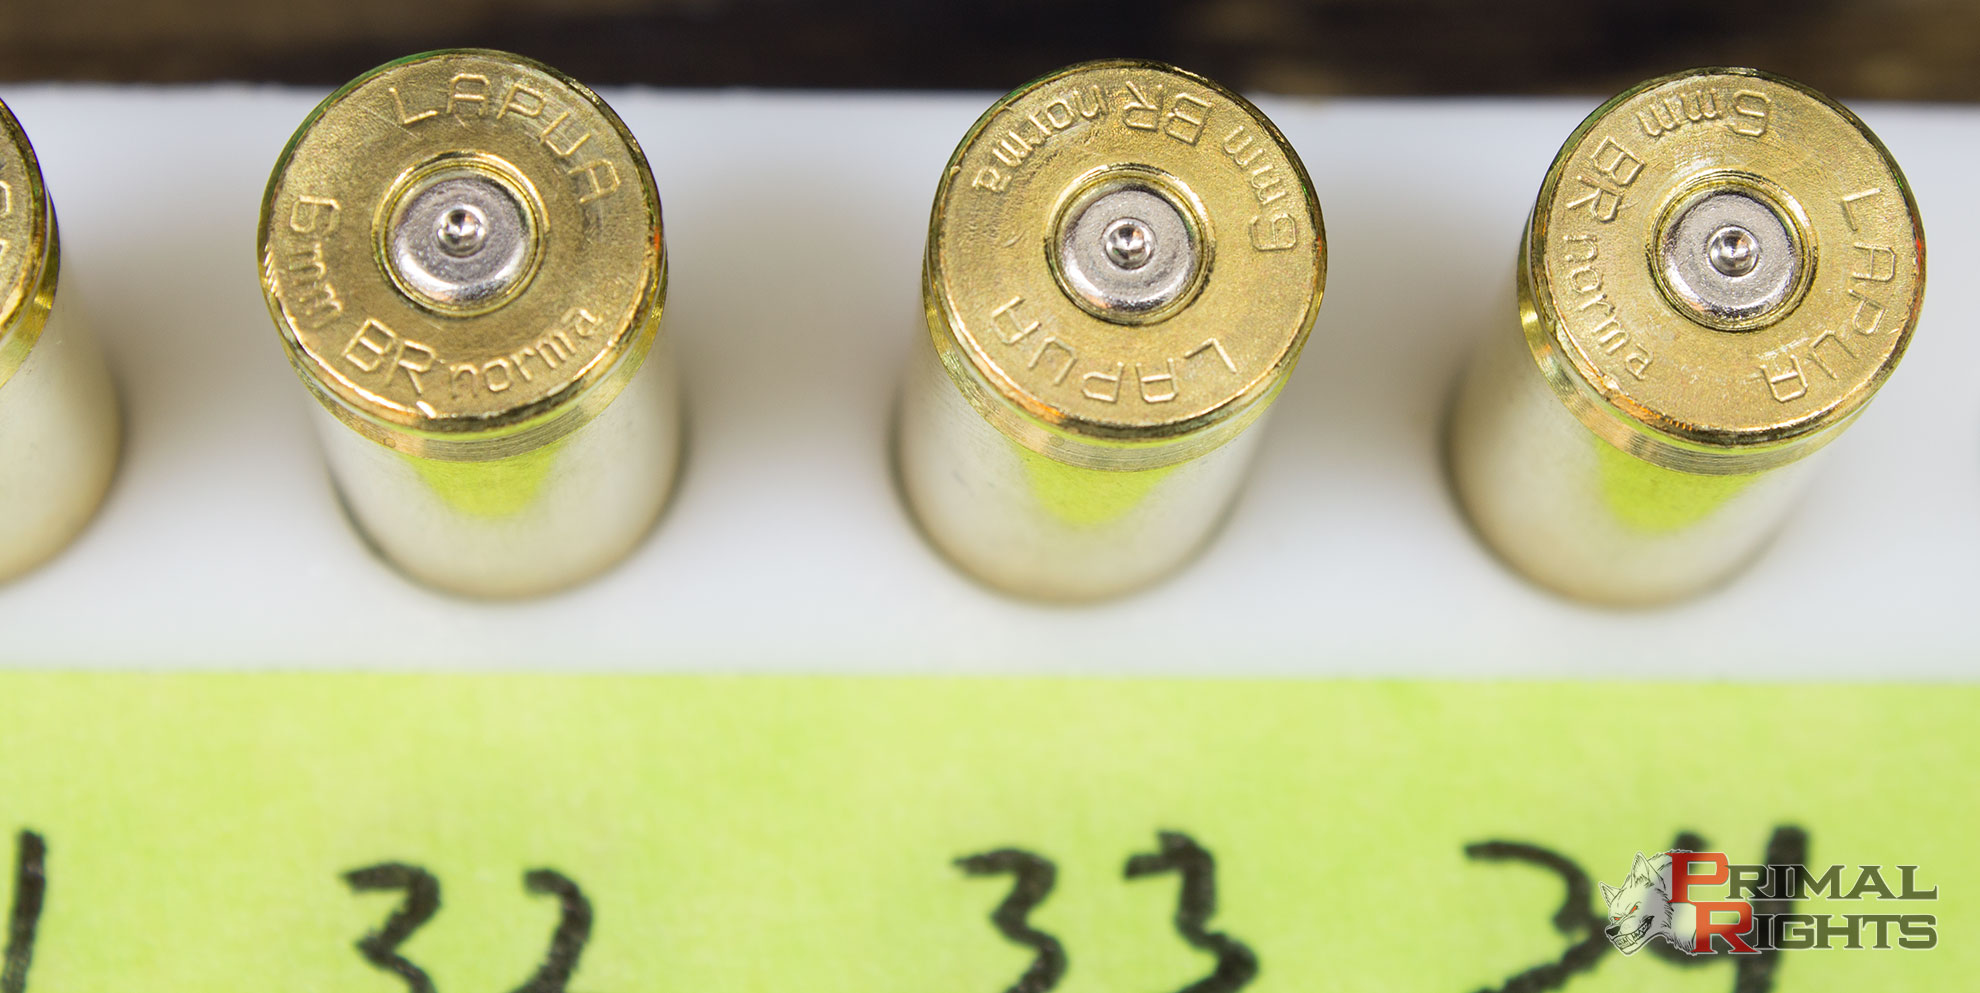
If you don't feel like getting a bunch more rounds down the tube and just want to proceed to the load development, you will need to foul the barrel in at the very least before moving on. Ten rounds should do it, depending on your specific barrel. It is important to get the barrel fouled in to avoid getting a false-positive in the next phase of testing. After you get some fouling rounds through, it's time to perform a pressure ladder. This will tell us exactly where our specific configuration of components will start producing pressure in this barrel. On this 6BR I was quite confident that the 30gr load wasn't showing any appreciable pressure and I knew it wouldn't likely take more than a few grains before I picked up some pressure signs. I started the pressure ladder at 31gr and loaded one round in 1gr increments up to 34gr. When firing a pressure ladder, it is very important to fire one round at a time and very closely inspect the fired brass before moving on to the next charge weight. If you run into severe pressure before you've fired all the rounds loaded, you can simply pull the remaining rounds down. I typically will go until I see pressure, and then take one more step to make sure it wasn't a false positive. Certain cases may have variances which will produce pressure, even though the next step will produce none. Push past that first step to make sure you see real pressure on the next round. Notice in the image below that 32gr is clean, while 33gr has a bit of primer cratering. That was the first hint of pressure seen. One more step at 34gr showed more primer cratering with the outside edges of the crater starting to sharpen up a bit. That clearly indicates the pressure I was seeing on the previous step was real. It is outside the scope of this article to completely dive into all forms of pressure signs and how to read them. Suffice it to say that if you are seeing ejector wipe, ejector ring, primer flattening, and primer cratering... you most definitely have pressure and should back up a few steps down the ladder.
Be very aware of false positives, meaning, indications of pressure where there is likely not actually pressure. These false positives can come from a variety of sources. One of the most common is a cratered primer due to an enlarged firing pin hole in the bolt face. This is extremely common in remington 700 actions. Even some high end actions can come with ejector pins which are rough or pressing too hard on the case. This can cause a false positive ejector wipe indication. Two pressure signs which aren't very often false indications are ejector ring and primer flattening. It usually takes significant pressure to cause either or both of these things. However, even this can be false depending upon variables at play. For instance, a wet cartridge case can render the brass unable to stick to the chamber wall, which will in turn cause a ton of bolt thrust and most certainly cause the case head to flow into the ejector hole to some degree. While pressure is there, it may not be too much pressure, but rather a variable causing the system to not work properly. I'll have to get an article done on this in the future, as there is simply too much to discuss here in the scope of load development.
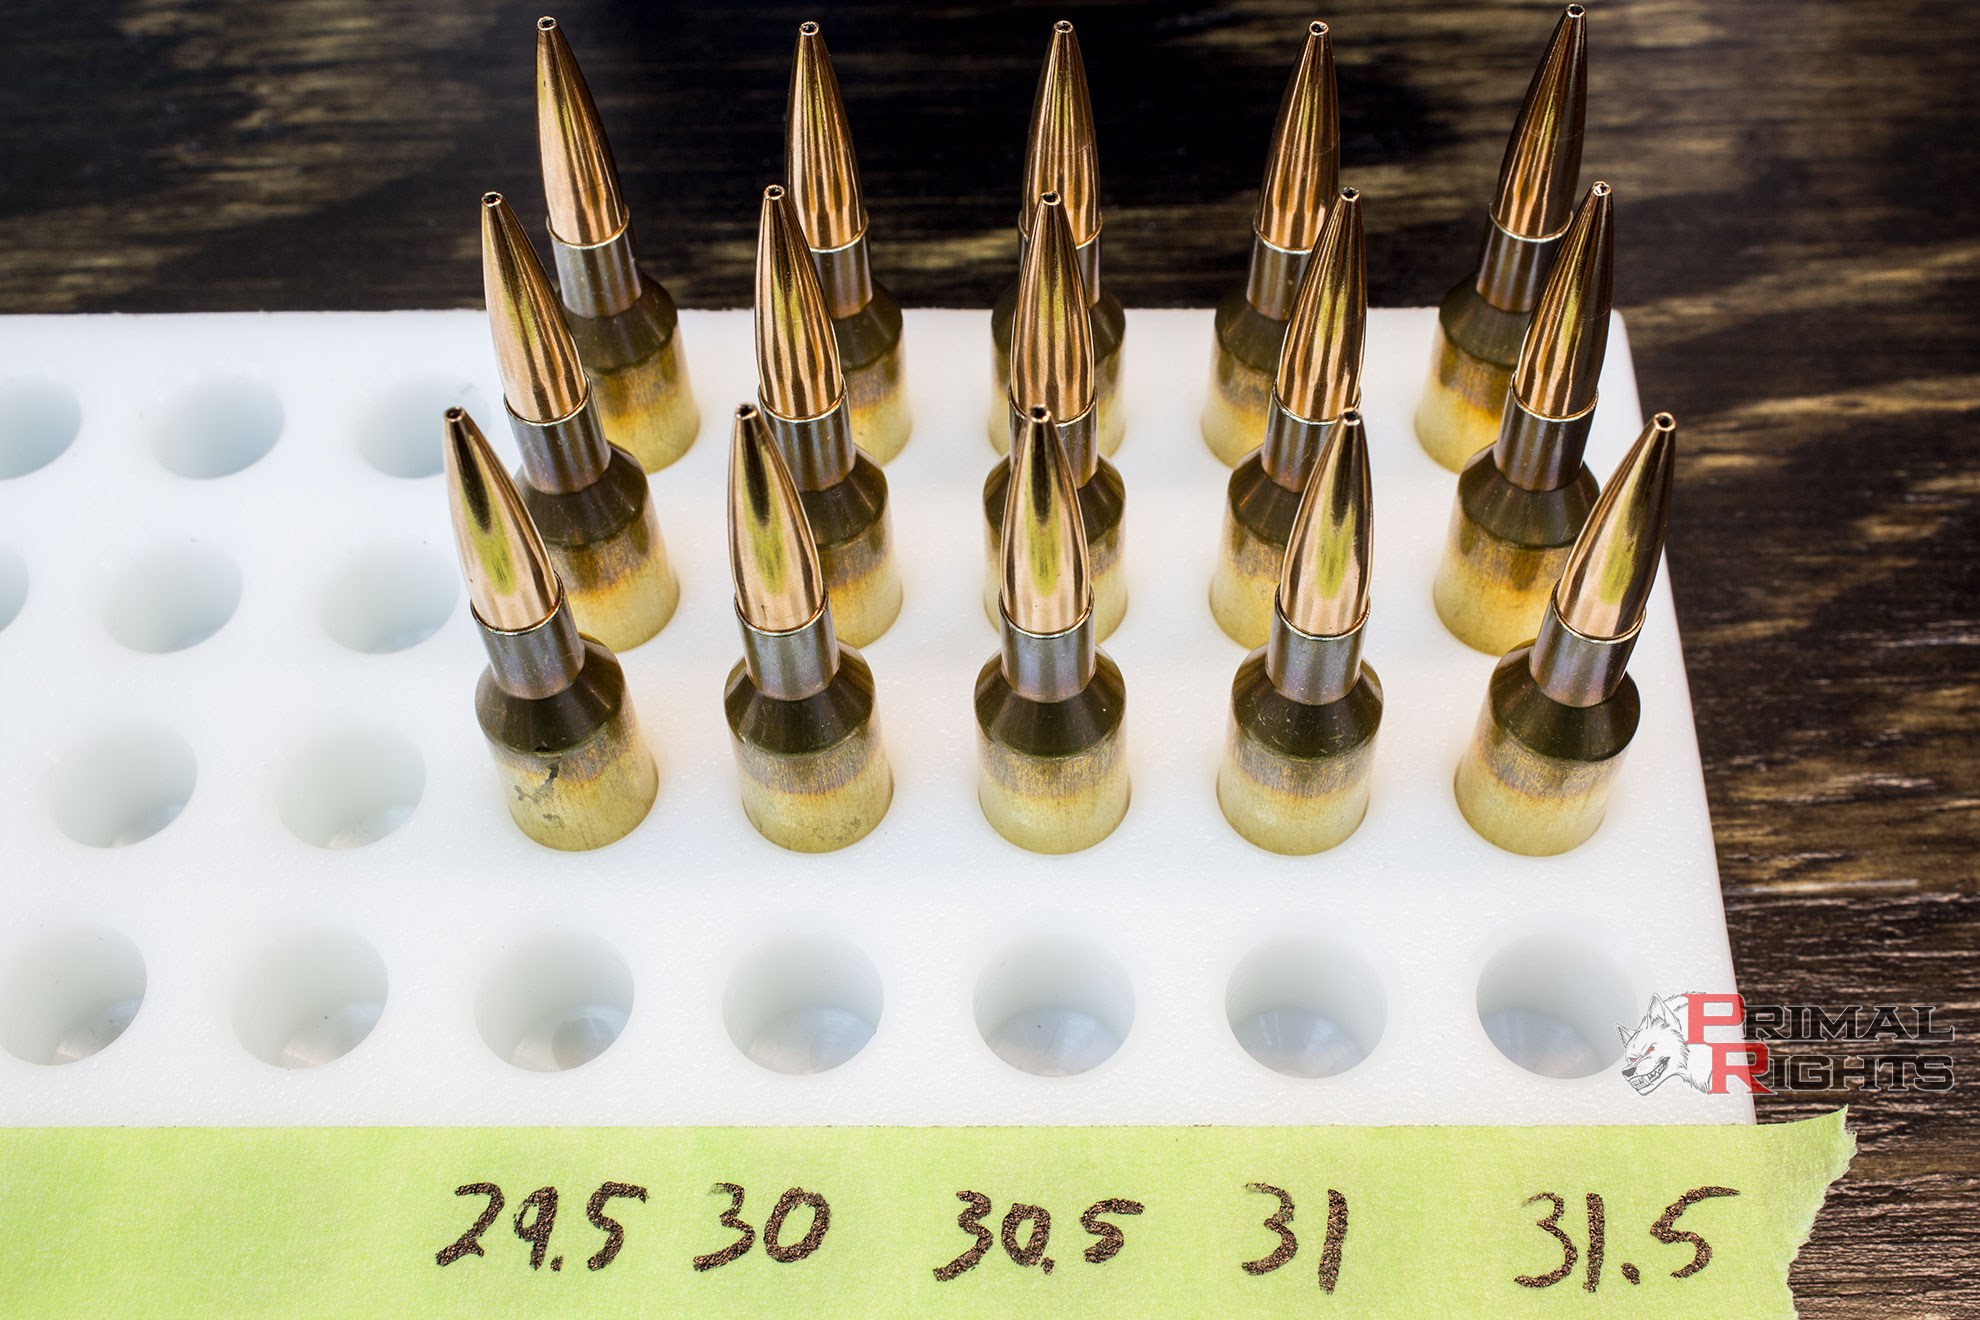
After doing the pressure ladder, we have a small look at the window of operation we want to focus on. I always try to stay a nice fair margin away from pressure. However there are other considerations here. At the time I did this testing, it was relatively cold out compared to when I may be primarily shooting this rifle. You can see here on this range report that it was 38 degrees. This is most certainly something you want to consider before deciding on your bracket of charge weights to test. Depending on the powder you are using it may, or may not be, sensitive to the atmospheric temperature. Some powder will drastically change burn rates based on temperature alone and can result in dangerous over pressure if not accounted for. Reloader powders are notorious for this behavior, but Varget which I'm using in my test here, is not. Having said that, it still is likely to pick up a few FPS if I go out on an 80 degree day instead of a 40 degree day. This is another choice which takes a bit of experience and instinct to work your way through. Based on what I know of Varget, I know that it is not very temperature sensitive at all. Thus, I'm going to set 32gr as my upper limit. As a result, I'll plan an OCW test from 29.5 to 31.5.
OCW - Optimum Charge Weight. This is the very core of load development. Just as the name suggests, we are trying to discover the optimum powder charge for the components and component configurations we've selected. To perform the test you will need to load up 3 rounds at each charge weight. We will keep the same seating depth and same everything else. The powder is the only variable we want to change between them for this test. There are different schools of thought regarding the frequency and order in which they should be fired. Some believe a "round robin" method where you shoot one round from each charge weight, let the rifle cool, and then come back around shooting another round from each charge weight. Obviously you shoot the similar charge weights at their own POA. I strongly disagree with this method. Shooter induced error is the number one way in which tests such as these get disrupted. Any of you that have been to our precision rifle fundamentals training class already knows this, but for those that have not: When you switch your point of aim, you must completely recreate your natural point of aim. This is not something most shooters excel at. So when you shift to a different target, you tend to have slightly imperfect form unless you are quite accomplished at building your firing position. However, even if you are, now is not the time to introduce variables just for practice. Now is the time to be eliminating all variables. You need the most honest shots of your life, 3 at a time. Not one at a time at 5 different targets. So, you want to select one point of aim for the first batch of rounds, which in this case is 29.5gr. Take special care to build your firing position flawlessly and execute those shots perfectly with accurate calls. When those rounds are done, completely rebuild your firing position on the next point of aim and execute the next group of 3 just as flawlessly as the first.
The cadence in which you fire these groups will largely be determined by the cartridge you are shooting as well as the configuration of the rifle. This 6BR is only burning 30'ish grains of powder. That sure isn't much to heat things up. Conversely a 338LM burning 90+ grains of powder will most definitely require a slower pace with much longer cooling periods between groups. The contour of your barrel is also a determining factor here. Skinny sporter barrels will heat up and cause POI drift much sooner than thick target barrels, as a rule.
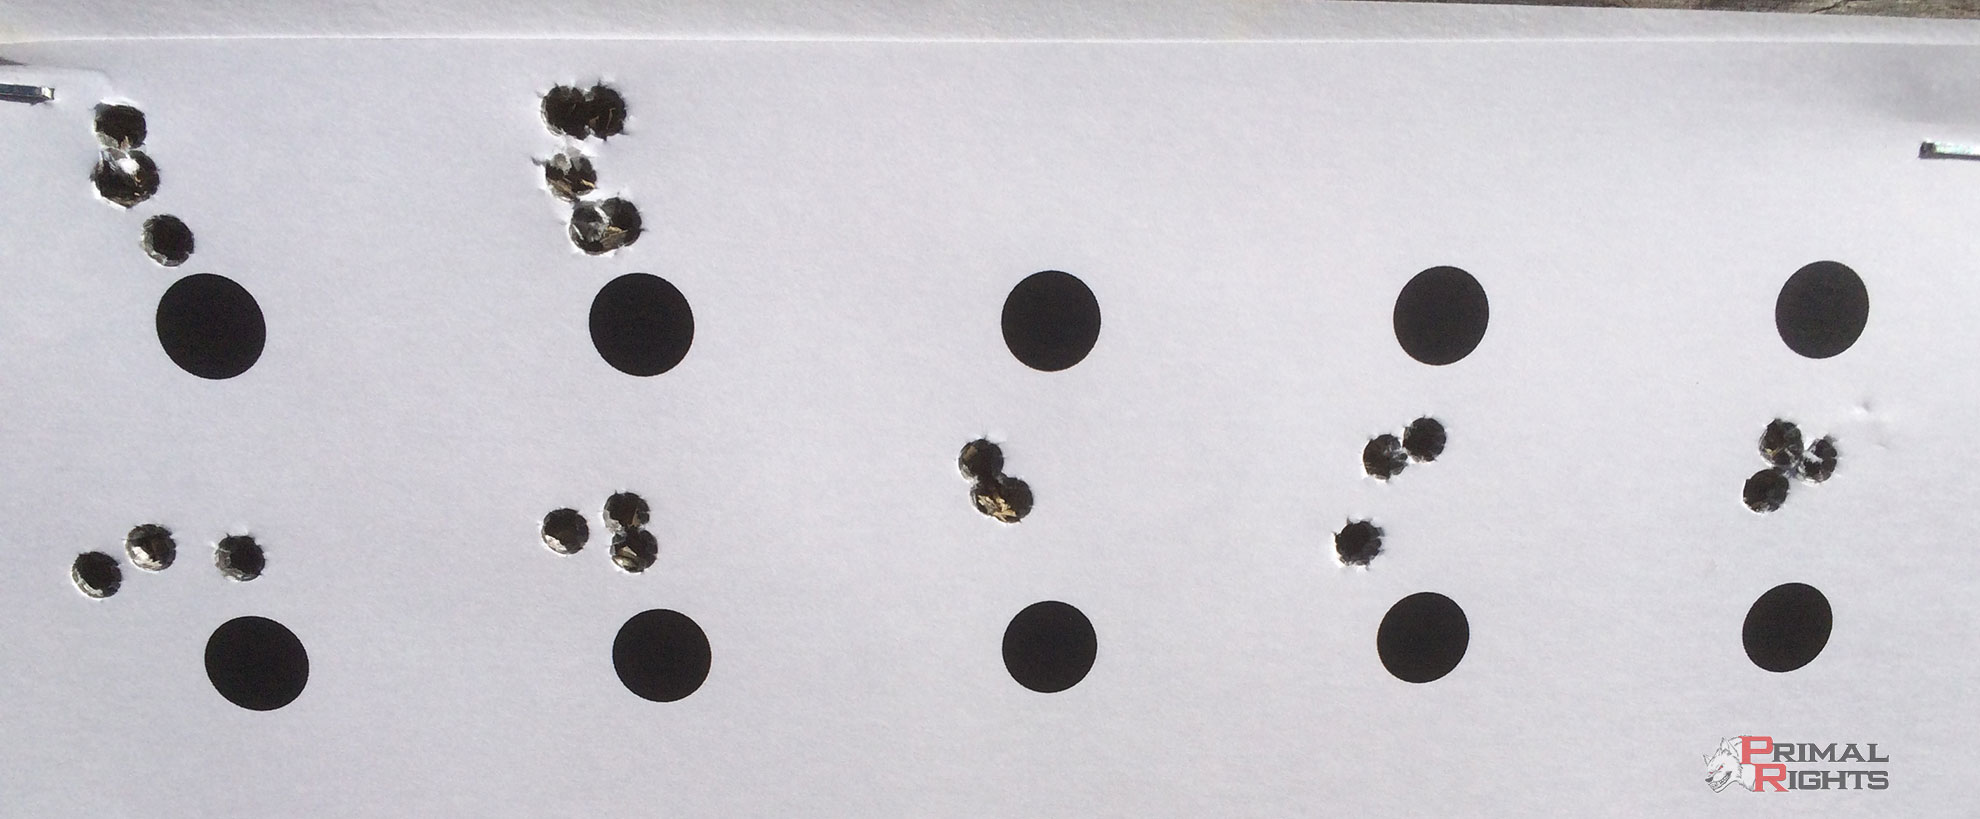
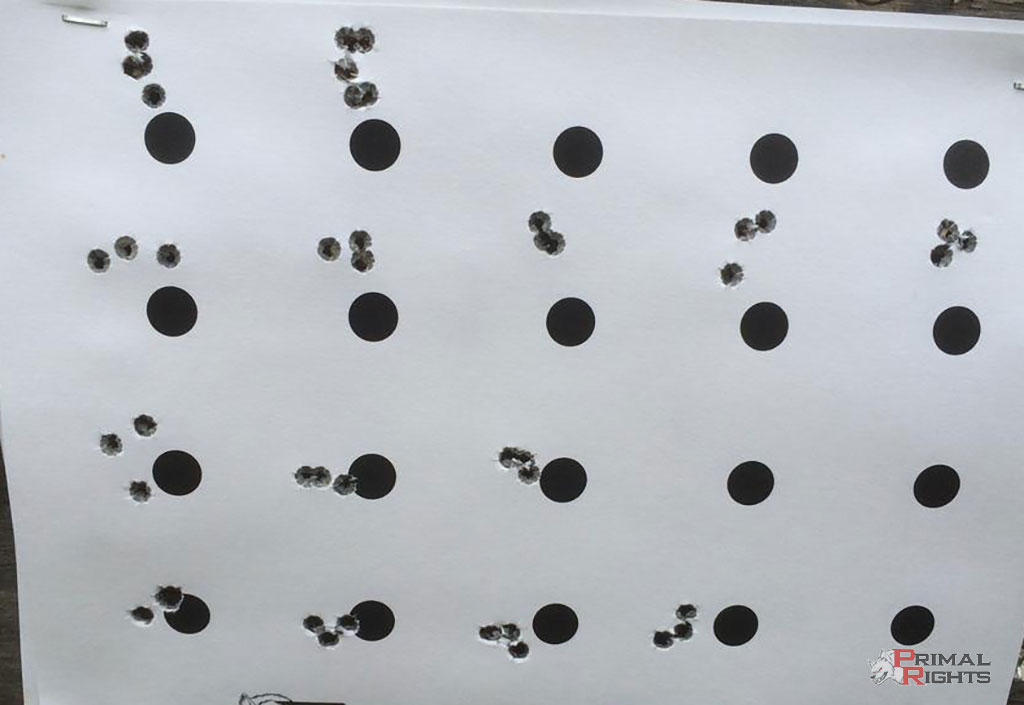
After you've fired the OCW groups at the target, it's time to evaluate the results. The target below is a series of 1/2" dots which was placed at 100yds. OCW testing can be done at any range you prefer, but 100yds is considered standard and will ensure environmental variables such as wind and mirage will have a very limited effect on the test results. The top left groups were fired during some of the barrel stabilization rounds earlier in this article. I was able to narrow down the vertical stringing of those groups to neck tension issues with this virgin lapua brass, not to mention that I'm not always locked on to shooting form during the stabilization rounds. Sometimes my concentration is elsewhere while I hammer through some learning about the barrel. Sometimes round count needs to get down the tube in short order, and I'll just bang away. A guy has to have fun too. ;) The OCW groups were fired at the second row of dots, from left to right, in order of charge weight. So 29.5gr was on the far left, while 31.5 was at the far right.
Interpretation of OCW results is probably one of the most frequent topics in the reloading sections of various forums. Here we'll go over just how to interpret the test target I shot with this 6BR. The goal of the OCW test is to identify a trend between the groups vertical point of impact and the point of aim. The horizontal shift can be almost entirely ignored. I repeat, horizontal shift can be almost completely ignored. That means if you have shots stringing left and right, that can be culled from your mind for the time being. Vertical dispersion is the only factor we are considering here. If you note the target below, you will see a trend. The groups on the left were closer to the dots (lower) while the groups on the right were farther away (higher) from the dots. If you look very closely, you can see that 29.5 is the lowest, 30 is just higher, and 30.5 is just higher than that. However, 31 and 31.5 are not appreciably higher than 30.5, are they?
... and there it is folks. That muzzle disruption and movement we were talking about at the very beginning of this article, has shown itself for all to see on paper. Were I able to continue stacking on powder, we would see the wave start trending downward as the timing of the bullets release coincided with a more chaotic muzzle state.
Those groups at the higher charge weights that are dead level vertically in relation to each other - Ladies and gentlemen, That is a node!
Before we get too excited, we have some things to explain here. Take a look at that 31gr group. Had one go out of the cluster low. You can either make excuses for that kind of thing, or you can simply have logical reasons. Either way, you'll need to reconcile flyers like this and own them. If you called your shots properly, you will know whether that flyer was caused by you, or not. You must trust yourself. If you don't know how to call your shots, well you better get a hold of me and schedule a precision rifle fundamentals class. If your call was spot on where the bullet landed, then obviously you know it was you, and had you done your part, that round would have clustered with its two buddy's up top. If your call was on the group above, then obviously it was a flyer which in this case could have easily been caused by the virgin and relatively un-prepped and unsorted brass. In any event, there is a surefire method of identifying whether it was the exception or the rule. Take a look at the group to the left of it, and to the right of it. See those little knots? Yeah, that was a flyer, and you can cull it from your mind with a clear conscience.
You can see the 30.5gr group is just ever so slightly lower than the 31 and 31.5gr groups. It appears I didn't go quite high enough on my bracket here. I'd love to see what is on the other side of that 31.5gr group. Easy enough. I could just load up another group of 3 at 32gr and see where they land. However, I've done this enough times to know there is most likely a flat spot between 31.5 and 32gr and possibly even wider. So, that would put my node from 31gr to 32gr, the center of which is 31.5. Here's the rough OCW range report on gunhive for these shots.
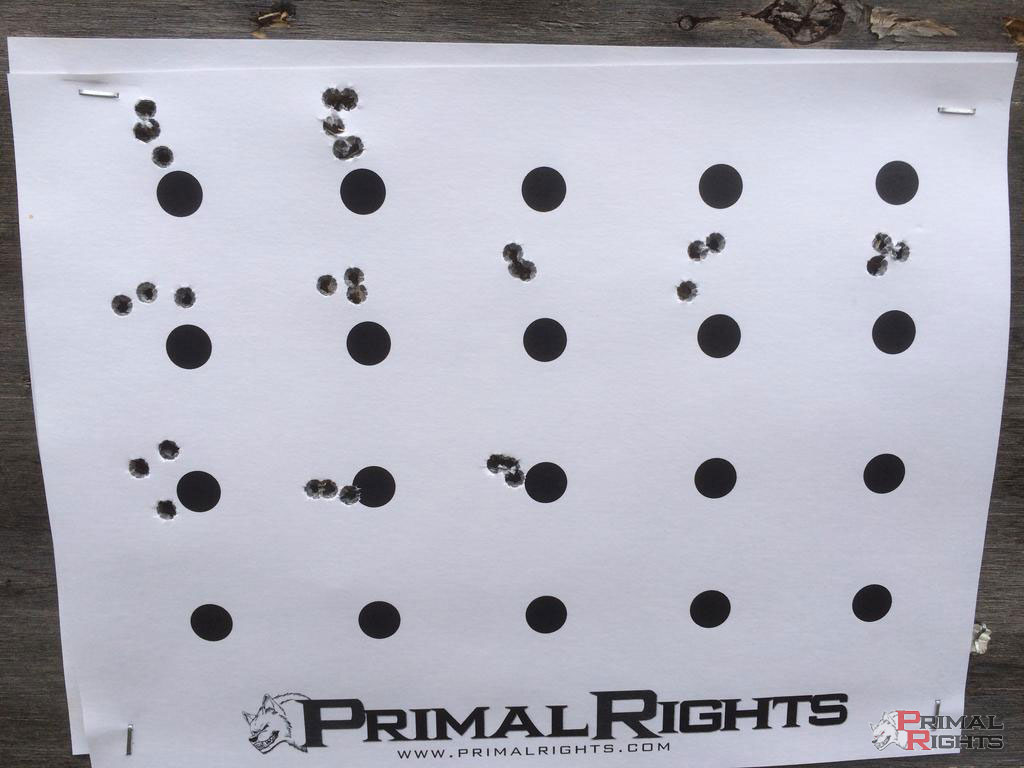
We need to be a little more sure of what is going on than just going with our first instinct here. This is where we load up a Fine OCW to double check our results from above to make sure it wasn't just a fluke. This time I'm going to run the groups in smaller increments of powder charge to see just what is going on. The target below shows the results. The 3rd row was shot left to right using charge weights 30.8, 31, and 31.2gr. Man, look at that first group! What the hell happened? I go from burning little clovers and knots through the paper to 3/4 moa? Maybe I suck? Interesting, but I'm not losing sleep over it. My calls on those shots were flawless, so I know I did my job. The "why" could range from brass issues to cranky teenage barrel issues. These rounds were fired from a cold barrel with more rounds than had ever been fired in sequence since the initial 20 rounds. Plenty of excuses, reasons, and guesses could be thrown at this. The important thing is as I approached my intended node, the knots returned. Nice little cluster there at 31.2gr. Tough to draw any conclusions from the first group, but the second two aren't appreciably higher or lower than each other. I can't really shoot better than they landed when its 55 degrees outside and a nasty 30mph wind kicking me around. Here's the range report from the Fine OCW.
Based on these results, I'm going to anchor in at 31.2gr and proceed with testing.
So why did i go with 31.2gr instead of 31.5gr? Hard earned experience and a lot of instinct... that's why. I know that after I get a few hundred rounds on this barrel, she's going to speed up. My node will almost certainly shift a bit, meaning the "timing" we have created here will advance. If I center up on the node which would appear to be right at around 31.5gr right now when it's 34-55 degrees outside and this early in the barrel's life, I will almost certainly slip out of the top end of the node as it gets warmer out and the barrel starts coming in. By going with a little margin on the lower end of the node, I buy myself some future-proofing with this load. With a little good fortune, as the timing advances I'll end up right in the middle of that node.
Those are some nice tight little knots there. Most people will stop right here. Heck, many don't even do a fine ocw. They just do the first round, call it good, and start loading rounds up based on their choice. Nothing wrong with that really, but it all depends on what your goals are. Sometimes 1/4moa isn't good enough, and you want to chase down that last bit. Well there is plenty more work to be done which might reveal any accuracy and precision potential you and your rifle have left in it.
Before we get on to that, I'd like to address a couple common problems folks run into when OCW testing. I often see targets posted on forums with requests for help with analyzing the results, and it looks like someone shot the thing with a shotgun. The majority of the groups I'm showing here are between 1/4 and 1/2moa. Look at those 3/4 moa groups on the left on row 2 and 3. Sure would be a lot harder to diagnose an OCW with a total vertical shift of 1/4moa when you're launching 3/4 to 1 1/4" groups wouldn't it? If you aren't able to produce some 1/2" or better groups at 100yds with relative consistency, you had better go back to the drawing board. Something needs fixed. Might be the rifle. Might be the component choices. Might be your optic. Might be you.
Despite those types of issues, the most truly common misunderstanding of OCW testing comes in the fact that people think it is going to help them increase their precision, ie: reduce their group sizes. That is predominately, if not entirely false. If you notice all the groups shown on this target above, you'll notice they are all round about the same, except those two groups on the far left. Notice those groups were both the first shots from the rifle for those strings of fire? Yeah... pay attention to what you see folks. The answers live in plain sight. ;) The rest of the groups are about the same size, give or take, aren't they?
Prepared to learn?
OCW isn't designed to increase precision. It's designed to increase accuracy.
If you aren't aware there is a difference, have a look at one of my earlier articles.
The shots that are out of the node are still precise, but they would not be accurate if the conditions shifted enough to appreciably change velocity. Therein lies the key. Keeping our load timed correctly for the rifle allows our point of impact to remain on our point of aim across a wide range of environmental variables as well as a wide range of error at the reloading bench. If we're off by a few kernels of powder, if one bullet seats just a touch harder than the others, if one primer is a touch hotter than the others, or if one case has slightly smaller internal volume. All of the potential variances are too many to count, but the moral of the story is that we want to buy ourselves as much forgiveness of those errors as possible, while still having our bullets land POA/POI. (land right where we are aiming)
I know, by now many of you are thinking "OK Greg, So if OCW won't help me shrink my groups, what will?!?" Smaller groups will come from things such as better components, different components, component sorting, better brass prep, better barrels, and better shooting technique. Improvements in group size can come from one or all of these things, but you will typically not drastically reduce group size by doing an OCW. If it happens, it's fortuitous, and most often can be assigned to a completely unrelated variable, but you shouldn't go into OCW testing expecting it. Your only concern during this phase of testing should be the POI's vertical relation to the POA.
Now that we have that solidified in everyone's mind, lets move to the next phase of testing! Take a quick glance at your round count. Depending on what you followed here, you probably have a relatively appreciable round count building up. It would be a good idea for you to clean here. Don't forget to load up some foulers and get your bore stabilized before proceeding with the next round of testing.
OSD - Optimal Seating Depth
After the OCW has been identified, the next step is to work on the bullet seating depth. Just as there is a sweet spot for the powder charge, there is usually one for the seating depth. The test setup for an OSD is much like that of the OCW. Essentially you load groups of 3 rounds at various seating depths and evaluate their vertical relation to the point of aim. Again, this doesn't have much if anything to do with group size. Mainly we are looking to fine tune the vertical, if any improvements are to be had.
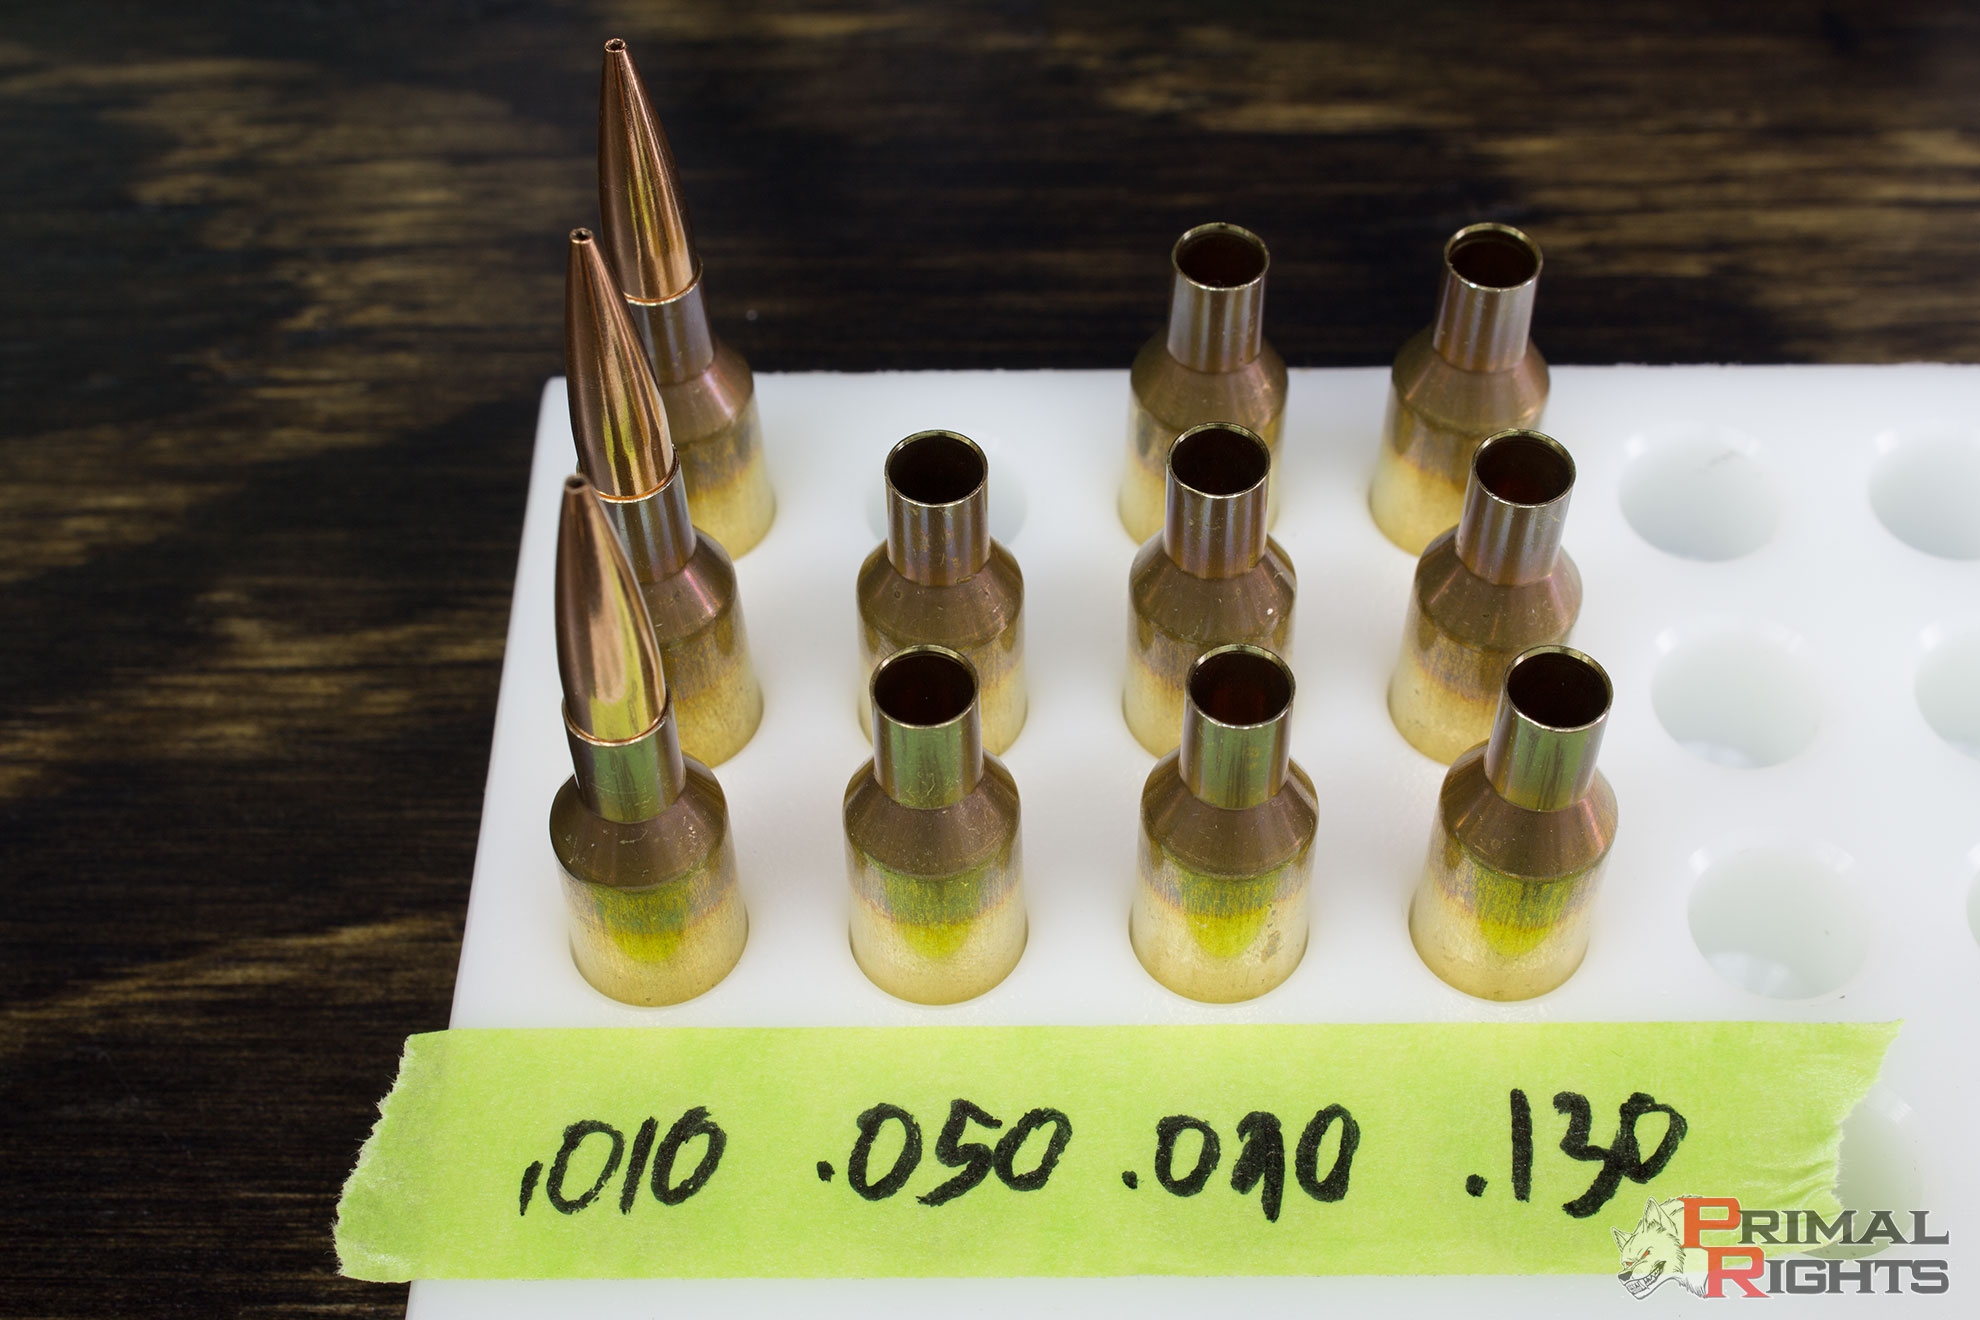
We started this entire process off at ten thousandths off the lands. Since most of you reading this article are field shooters like myself, we have no interest in going in closer to the lands for reasons that remain obvious. So, deeper is really the only option here. Determining the interval to use when pushing the seating depth back is largely a function of how much shooting you want to do. Berger has had an article published for some time now which recommends a .040" (40 thousandths) interval. This is certainly adequate. If you wanted to do a bit more shooting, then you could reduce that interval down to .025" for a finer resolution. I chose a 40 thousandths interval for the testing performed here. Four groups, 3 shots each, at progressively deeper seating depths. From left to right, starting at .010" off the lands and going to .130" off the lands in .040" increments. All other variables were kept the same and as uniform as possible. The only thing changed between the groups is the depth at which the bullet was seated.
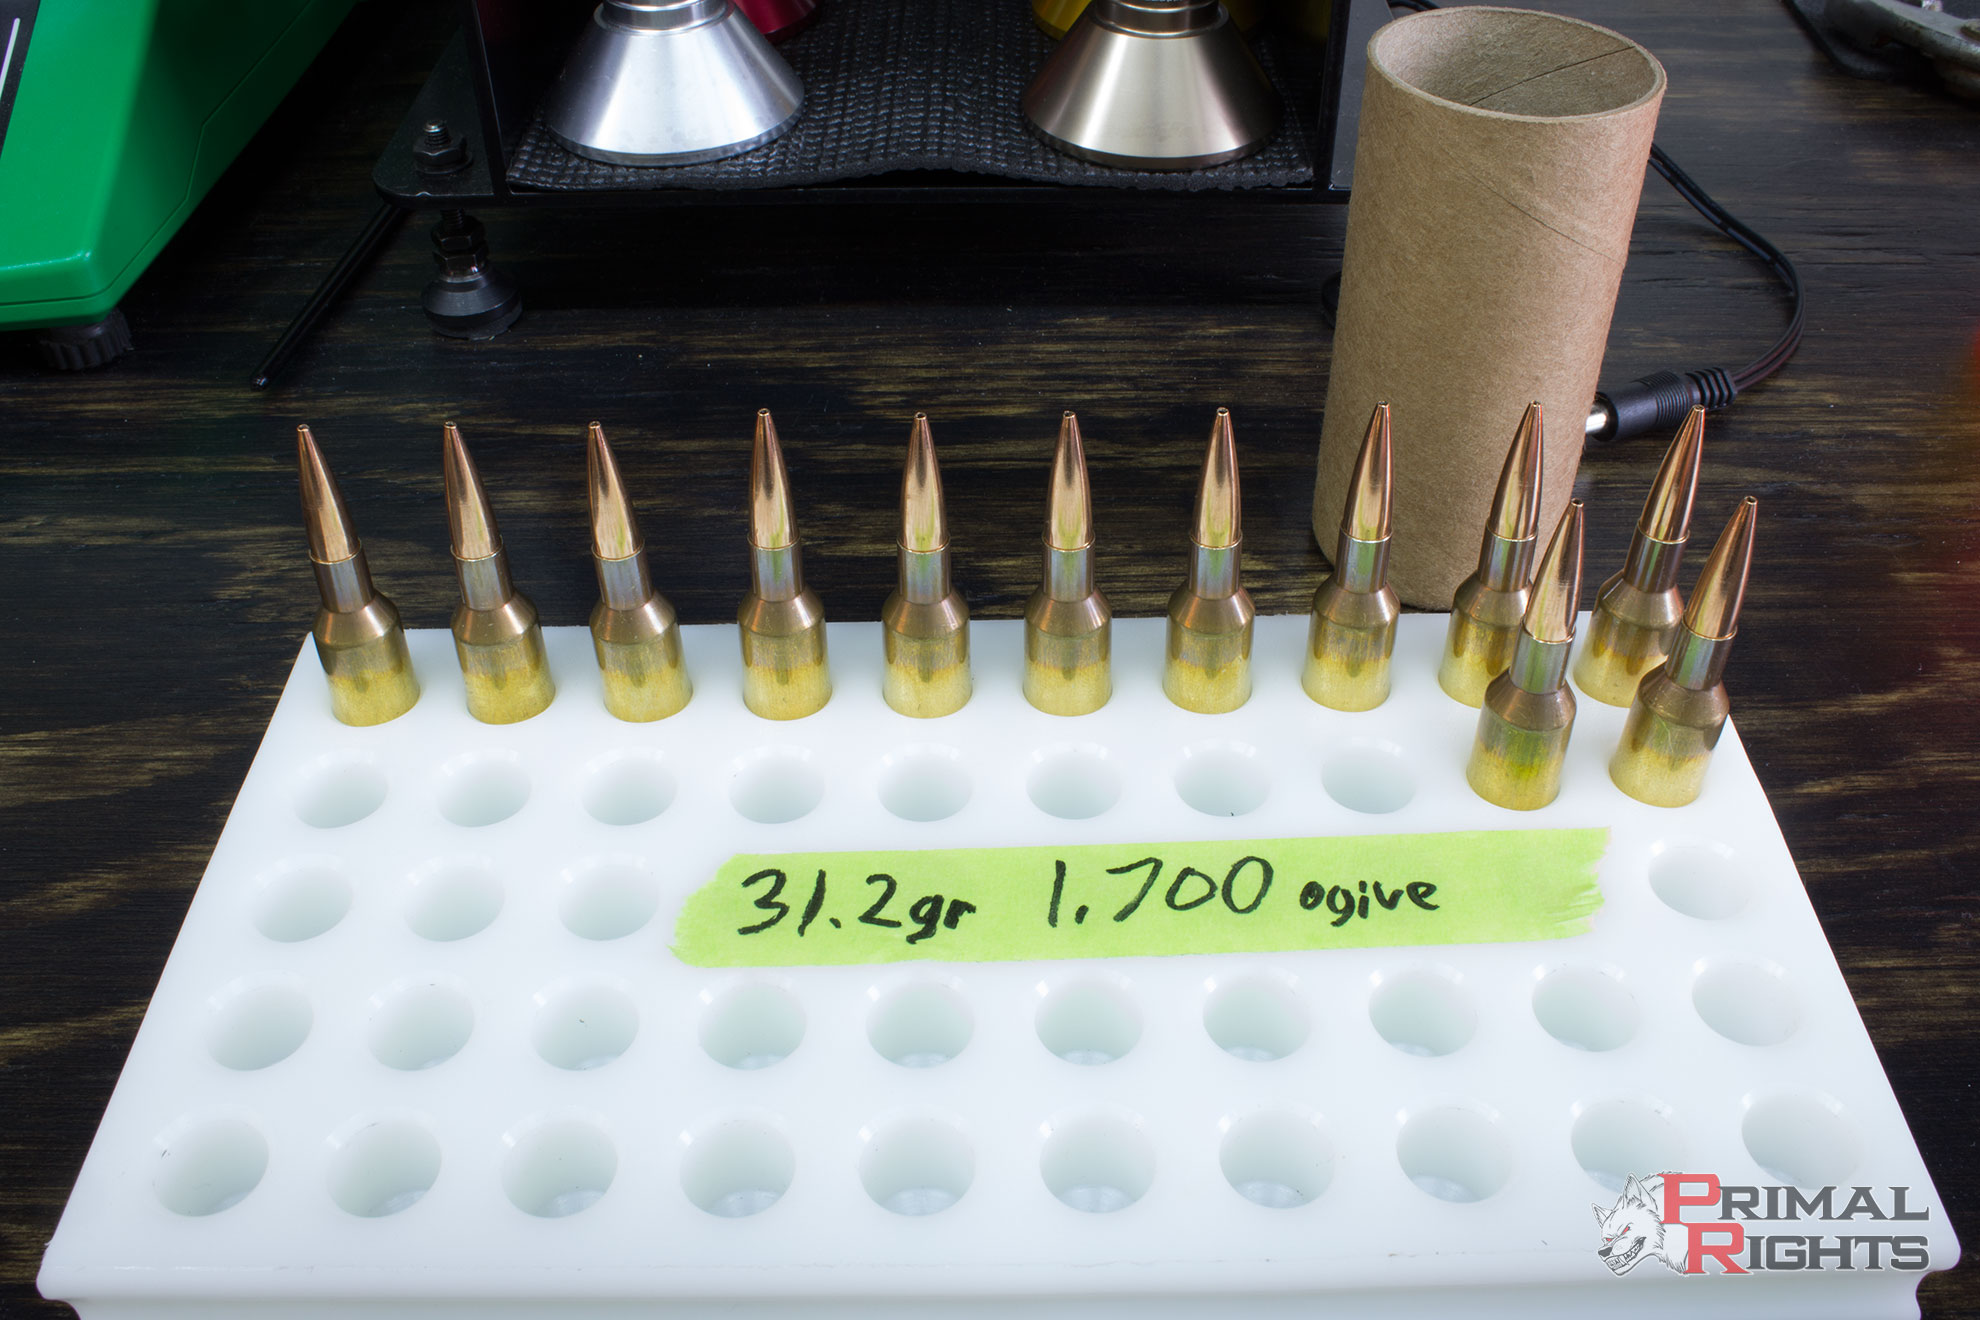
Below on the target you will see the results of the above OSD rounds on the bottom row of dots. The groups were fired in order of depth, from left to right, starting with .010 off and ending with .130 off. By the looks of it there is a small improvement to be had. The first group landed a bit toward the top of the 1/2" dot while the second two groups at .050" and .090" off landed toward the middle to bottom half. The final group at .130" off is right there with those two, with the exception of one high round. I will anchor in at .085" off the lands for simplicity. That will put my length to ogive right at 1.700" and is a nice convenient number which seems to fall right in the middle of a good OSD range. Given the fact that these 95gr VLD's are a bit short for this chamber, this will also put that bullet at a much more optimal placement in the neck. At this depth the bullets boat tail/body junction will be just above the case's shoulder/neck junction. This is optimal as the neck/shoulder junction on brass can often be the source of uniformity issues. This is especially true for folks that neck size only, as this pushes all the brass inconsistencies to the inside of the case.
Everything is going to plan with this rifle thus far.
After you've completed the OSD, it would be a good idea to load up a few rounds in this new configuration to test and see how things are going. You could also use this opportunity to grab some preliminary chronograph numbers. Notice this is the first time we are looking for velocity? Odd huh? The truth is that accuracy and precision have very little to do with velocity. It is literally one of the more insignificant factors at play in this entire equation. The entire premise of the OCW and OSD is to give us a window for error that will still stack shots in the same place on target. This phenomenon is not restricted to 100yds. It extends to range as well. Granted, we would like the lowest variation of velocity possible, but there is certainly some proof which shows rounds that are faster/slower still intersect targets at distance in the same place regardless of the fact that predicted firing solutions should find them hitting higher/lower depending upon their velocity. However, that topic is definitely outside the scope of this article and shall be left for another time.
It is noteworthy that if you have a chronograph with a light screen, IR gate, or acoustic trigger, you can set it up and shoot your OCW and OSD through it without any adverse effects. Well, no adverse effects unless you cause them. People get in the bad habit of chasing velocity instead of chasing accuracy. Don't be that guy. You can't miss a target fast enough to hit it! Do not use a magnetospeed or other chronograph that attaches to your muzzle during any of this testing. Those chronographs are incredibly accurate, and I like them a lot, but they do shift the POI of your rifle without question. This can/will skew your test results. You can use them on later rounds after the load has been completely developed and solidified.
Chronograph Results
| Shot | 1 | 2 | 3 | 4 | 5 | 6 | 7 | 8 | 9 | 10 | AVG | SD |
| FPS | 2662 | 2688 | 2678 | 2683 | 2673 | 2668 | 2699 | 2678 | 2678 | 2671 | 2677 | 10.5 |
If you have made it this far and you're still with me, give yourself a pat on the back. This is farther than most go when wrangling these demons from our rifles. If you're waiting for some big revelation that will turn these .250 to .350 groups into .0's, let me save you the suspense: If you're shooting off a field bipod, not an F-class rig or benchrest setup, understand that you will need to be one of the best shooters in the entire world with one of the most precise barrels in the world to consistently better-deal .250" at 100yds in field condtions with no flags and no sighters. Go take a look at some 100yd rail gun scores for a quick reality check. If guys running a 100lb rifle with a 2" diameter barrel in a machine rest can't consistently knock out groups in the .0's, then you sure as hell are not going to be able to do it with your bipod and rear bag.
So, take a breath. Seriously. Just relax and give yourself a moment to enjoy the fact that you learned an incredibly valuable skillset today. Don't beat yourself up if you can't punch out little knots down there just yet. It takes years of discipline to do that, and then many more years to consistently get those knots to land right on top of your POA.
Primer testing is conducted virtually the same way, but instead of using powder as your variable, you would use the primer as the variable. So three rounds with CCI-400, three with CCI-450, three with Winchester, and so on. There are many various forms of testing you can do using the above outlined methods. If you want to figure out what component to use, comparative analysis is really the only way to discover what your rifle likes as well as whether those components are uniform.
After you have developed your load, it is a very good idea to verify it at the distances you intend to shoot it. It doesn't do you much good if your newly developed load shoots great at 100yds but doesn't at your intended range of 1000yds.
Another thing you'll want to know is that some rifles are very finicky and will have very narrow accuracy nodes, while others will be very forgiving and will have wide accuracy nodes. There are no hardened rules which determine which rifles will be finicky while others are not. There are some rough guidelines to follow however. Barrel contour is one of the biggest factors in the stability of nodes. Very thick barrels are much more rigid and resist movement during expansion much more than skinny sporter contour barrels. If barrels weren't so heavy, everyone would be running around with straight 1.250" barrels with no contour. Yet they are heavy... and as such you'll want to pick a good balance based on the intended application of the rifle. Another huge factor in the forgiveness of a rifle is the gunsmith that puts it together. In keeping with the purpose of this article, we want as much forgiveness of variables as possible. This is a much easier job when you're working with a rifle that is designed to shoot pretty much everything well.
Most Recent Posts
Primal Rights, Inc
18570 Chance Rd
Meadow SD 57644
© Copyright 2009-present Primal Rights Inc
ALL RIGHTS RESERVED
No part of this website or any of its content may be reproduced, distributed, or transmitted in any form or by any means without the express prior written permission of Primal Rights, Inc